(!)Due to Microsoft's end of support for Internet Explorer 11 on 15/06/2022, this site does not support the recommended environment.

ideanote
inCAD Library

Please read before use

What is inCAD Library?

  • Helpful application examples for mechanical engineers.

The Concept of inCAD Library

  • Online application library with a range of ideas for all manufacturing industries.
  • Save design time and learn new design applications when you are concepting new machines.

Disclaimer

  • MISUMI may not offer all parts in each application design. Available parts can only be purchased separately not as a unit shown in each application design.
  • MISUMI does not guarantee quality, accuracy, functionality, safety or reliability for the combination of the parts in each application example. Accept these points prior to use.
  • 2014 Copyright MISUMI
  • The data cannot be used for any purposes (including sales promotion) except for designing your machine.
  • All associated CAD is free. Misumi reserves the right at its sole discretion to cancel, terminate or modify this offer.
  • MISUMI may change, add or delete application examples posted without prior notice.
  • MISUMI assumes no responsibilities for any damage incurred resulting from your use of the Service or any change, addition or deletion by MISUMI of the application examples for any reason whatsoever.

inCAD Library Features

  1. Get great new design ideas for these application examples.
  2. Over 300 design application ideas
    collected from dozens of industries!

  3. Find application examples quickly! Search by function, workpiece shape, etc.

  4. Download the CAD models for each application example.
  5. Log in to download free CAD models.
    Download CAD for the entire application example!

Good IDEA! button

Click the Good IDEA! Button when you like an application example!

*Can only be clicked once per application example.

  • Upper right corner on the page of application example details

  • Pop-up dialog for CAD data downloading

Page top

Keyword Search
No. Search

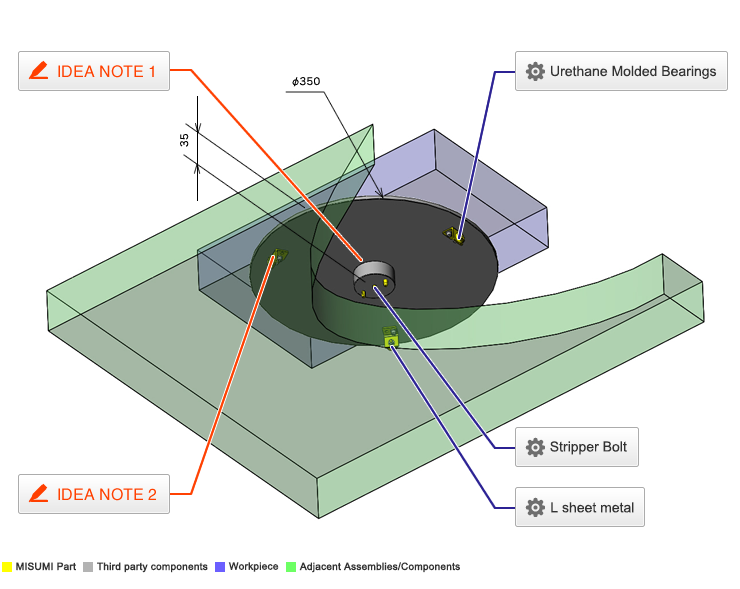
No.000183 Removable Turntable

Bottom view of removable turntable.

Relevant category
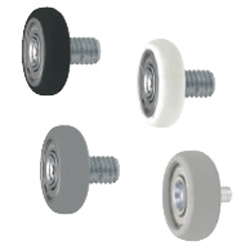
Urethane Molded Bearings

Product name Silicon Rubber Mold Bearings - Crown, with Threaded Shaft
Part number UMSWRT5-16
* Orange colored cells in the table below indicate the part numbers used in this example.

Selection criteria

Support rotary motion without scratching the rotating surface

Back to page top

Available sizes

■Urethane molded bearings, Crown type with long thread, shape A

Tire Section Bearing Shaft
Material Hardness Color Material Surface Treatment
Urethane Shore A90 Black 52100 Bearing Steel Carbon Steel Electroless Nickel Plating
White 52100 Bearing Steel Carbon Steel Trivalent Chromate
440C Stainless Steel 303 Stainless Steel
Silicon Rubber Shore A70 Light Gray 52100 Bearing Steel Carbon Steel Electroless Nickel Plating
440C Stainless Steel 303 Stainless Steel
Anti-static Urethane Shore A90 Gray 52100 Bearing Steel Carbon Steel Electroless nickel plating

■Sizes and Dimensions

O.D. Bearing Screw Dia.
(Coarse)
Thread
Length
Roller Width Circumference R
φ12 W683ZZA M3 6 3 5
φ13 W684AX50ZZ M4 8 4
φ16 624ZZ 5
WBC5-13ZZ
φ20 625ZZ
696ZZ M6 12
φ28 626ZZ 6
608ZZ 7

Back to page top

Performance info.

■Allowable load of the urethane molded bearings, Crown type

O.D. Bearing Allowable Load N
Urethane Silicon
Shore A90 Shore A70 Shore A70
φ12 W683ZZA 34 10 9.8
φ13 W684AX50ZZ 44 13 13
φ16 624ZZ 59 16 18
WBC5-13ZZ 16
φ20 625ZZ 78 20 24
696ZZ 23
φ28 626ZZ 157 44 47
608ZZ 176 42

Back to page top

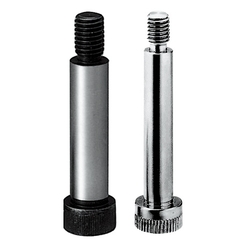
Stripper Bolt

Product name Shoulder Bolts - Tolerance e9
Part number SMSB6.5-15
* Orange colored cells in the table below indicate the part numbers used in this example.

Selection criteria

Suitable for supporting rotary motion

Back to page top

Available sizes

■Shoulder bolts - Shaft Dia. Tolerance e9

Material Hardness Strength Class
4137 Alloy Steel 33~38HRC 10.9
304 Stainless Steel A2−50

■Sizes and Dimensions

Material Under head
DIA.
Shaft length under head Head Thread
10 15 20 25 30 35 40 45 50 55 60 65 70 75 80 85 90 95 100 110 120 130 140 150 O.D. Height Thread Dia.
×
Pitch
Length
4137 Alloy Steel φ4 φ6.5 3 M2.5×0.45 5
φ4.5 φ7 M3×0.5 6
φ5 φ8 3.5
φ5.5 φ9 4 M4×0.7 7
φ6
φ6.5 φ10 5 M5×0.8 9
φ8 φ13 6 M6×1.0
φ10 φ16 8 M8×1.25 12
φ12 φ17
φ13 φ18 10 M10×1.5 16
φ16 φ24 14 M12×1.75 18
φ20 φ27 18 M16×2.0 24
304 Stainless Steel φ4 φ6.5 3 M2.5×0.45 5
φ4.5 φ7 M3×0.5 6
φ5 φ8 3.5
φ5.5 φ9 4 M4×0.7 7
φ6
φ6.5 φ10 5 M5×0.8 9
φ8 φ13 6 M6×1.0
φ10 φ16 8 M8×1.25 12

Back to page top

Accuracy Info

■Accuracy of shoulder bolts -Shaft dia. Tolerance e9

Shaft Dia.
Tolerance of O.D. Dimension
φ4 −0.020/−0.050
φ4.5
φ5
φ5.5
φ6
φ6.5 -0.025/-0.061
φ8
φ10
φ12 -0.032/-0.075
φ13
φ16
φ20 -0.040/-0.92

Shaft length tolerance: ±0.1mm

Back to page top

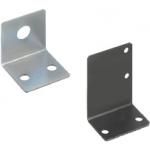
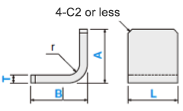
L sheet metal

Product name Sheet Metal Mounting Plates / Brackets (for Sensors / for Motors / for Cylinders) -Angle Type-
Part number FALBS-SUD-T2.0-A22-B20-L20-X10-H16-N4-Y5-V10-S12-NA4
* Orange colored cells in the table below indicate the part numbers used in this example.

Selection criteria

Suitable for customized bracket support.

Back to page top

Available sizes

■L Sheet Metal Brackets (Dimension Configurable Type, 1 Hole x 2 Holes)

Material Surface Treatment Plate Thickness
Low Carbon Steel 1.6、2.3、3.2
Black Oxide
Trivalent Chromate (Clear)
Trivalent Chromate(Black)
Hot Rolled Steel 4.5、6.0
Black Oxide
Trivalent Chromate (Clear)
Trivalent Chromate(Black)
5052 Aluminum Alloy 1.5、2.0、3.0、4.0、5.0
Anodize (Clear)
Anodize (Black)
304 Stainless Steel (2B) 1.0、1.5、2.0、3.0、4.0、5.0

■External Dimensions

Plate Thickness Hole Dia. [A]Overall height [B]Depth [L]Overall width
(1 mm increments)
1.0~5.0 φ3、4、5、6、8、10 22~200 22~200 26~200
6.0 22~300

* Hole positions configurable. Please see the product pages for details.

Back to page top

IDEA NOTE Locking the turntable

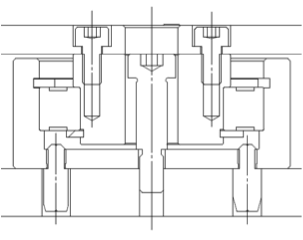
The bolt to lock the turntable into position is one in the center. To prevent loss of the center bolt, the bolt is designed not to be removed from the turntable.

IDEA NOTE Preventing deflection of the turntable

To prevent turntable deflection urethane mold bearings are placed on the table bottom surface at three locations.

  • TERMS AND CONDITIONS FOR USE OF CAD DATA
    Your access to the CAD data that MISUMI Corporation (hereinafter referred to as the Company) posts on this site (including 3D CAD data, intermediate 3D CAD data and 2D CAD data; hereinafter referred to as the Data) are of products manufactured and/or sold by the Company (hereinafter referred to as the Products) assumes that you have read and accepted these terms and conditions which govern your use of the Data. If you do not agree to these terms and conditions, you must stop using this website and the Data. You must not use the Data for any unlawful purpose or in any manner inconsistent with these terms and conditions.
    1. CAD Data
    The Data is prepared for assisting the Company's users in the CAD design process by providing dimensions and other Product information. In order to provide the best speed and stability working within this site, the Product drawings were simplified to reduce the size of the Data. For instance, some of the Products are shown without the oil groove shape, screws or spring shape. Also, please be aware that the tolerance, surface roughness and/or chamfer of the Data may vary from the actual Products.
    2. Disclaimer on Data
    While the Company has carefully prepared the Data, accuracy of the Data is not guaranteed and is subject to the variances as described above. The Company may also modify, add or delete the Data at any time without prior notice. The Company assumes no liability for any direct, indirect, consequential or special damages that you may claim resulted from your use of the Data or any changes to or deletions of the Data regardless of the reason. The Company provides no warranty as to the quality, accuracy, functionality, safety or reliability of the combination of Products and parts. Example applications and combinations of the Products are provided for illustrative purposes only.
    3. Copyright
    Copyrights to the content and the Data belong to the Company or the manufacturers of the Products. The said copyright is protected by the Copyright Act and international treaties. The use (including duplication, modification, uploading, posting, transmission, distribution, licensing, sales and publishing) of the Data except for the purpose to use the Data described above without prior approval of the Company is not allowed. The Data cannot be used for any purposes (including sales promotion) except for designing your machine. If you violate this provision or the laws or regulations, the Company may prohibit you from the use of the Data, the Company’s site and/or take legal action. So long as you comply with these terms and conditions, the Company grants to you a non-exclusive, non-transferable, revocable license to access and use the Data for the sole purpose of assisting you in designing machines that incorporate products.
    In case that the CAD data is found to have been to be used for any purpose other than mentioned above or against the related laws, MISUMI may take legal actions, including the one for blocking the involved user from using CAD data and from accessing to the MISUMI site.
    4. Disclaimer of Warranty
    ANY AND ALL CONTENT APPEARING ON THIS WEB SITE IS PROVIDED FOR INFORMATIONAL PURPOSES ONLY. THIS WEB SITE, ITS CONTENT AND ITS LINKS ARE PROVIDED ON AN "AS IS" AND "AS AVAILABLE" BASIS AND ARE USED ONLY AT YOUR SOLE RISK, TO THE FULLEST EXTENT PERMISSIBLE BY LAW. THE COMPANY DISCLAIMS ALL WARRANTIES, EXPRESS OR IMPLIED, OF ANY KIND, REGARDING THIS WEB SITE (INCLUDING ITS CONTENT, HARDWARE, SOFTWARE AND LINKS), INCLUDING AS TO FITNESS FOR A PARTICULAR PURPOSE, MERCHANTABILITY, TITLE, NON INFRINGEMENT, RESULTS, ACCURACY, COMPLETENESS, ACCESSIBILITY, COMPATIBILITY, SECURITY AND FREEDOM FROM COMPUTER VIRUS. THE COMPANY WILL NOT BE LIABLE FOR ANY DAMAGES OR LOSSES, INCLUDING DIRECT, INDIRECT, CONSEQUENTIAL, SPECIAL, INCIDENTAL OR PUNITIVE DAMAGES AND/OR LOST PROFITS, IN CONNECTION WITH USE OF THE INTERNET, THIS WEB SITE, ITS CONTENT OR ITS LINKS
    Further, the Company will not be liable to you for any failure or delay by the Company to provide access to the Data or any of its obligations under these terms and conditions where such failure or delay is the direct or indirect result of any circumstances beyond the Company's reasonable control (and the Company's obligations will be suspended for the duration of such circumstances).

    CAD Download (Unit Assembly)

    CAD Download: File Format
    生成

    Thank you for downloading the data.

    Click the Good IDEA! button when you find interesting design tips.


    This data is utilized in order to list more useful application examples in the future.

    CAD Data Limitations

    1. Assembly data shows the assembly drawings in the concept design phase. The sole purpose of the data is to explain the structure and functionality of the assembly and is not considered nor to be used as a final design.
      You will need to edit the Data so that it meets your specific design conditions.
    2. Unit assembly Data consists of some sub-assemblies.
      It is configured so that each sub-assembly unit can be used as it is or edited.
    3. * The part in the frame is a sub-assembly unit.

    4. The Data for fabricated parts is based on easy-to-edit dimensions and shapes in sketches and histories.
    5. The Data including the third-part components are made by the Company.

    Page top

  • * Unit assembly Data consists of some sub-assemblies.
       It is configured so that each sub-assembly unit can be used as it is or edited.

Application Overview

Purpose

  • Purpose
    • Used for product inspection/repair.
  • Operation
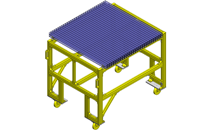
    • Product inspection and repair are conducted on a workbench. If the turntable is not needed, it is removable by loosening center turntable bolt. When re-installing, use the two center locating pins to position the table and tightening the center bolt.

Points for use

  • The turntable is rotated manually.

Target workpiece

  • Shape: Block
  • Size: W 430 x D 250 x H 70 mm
  • Weight: 6 kg

Design Specifications

Operating Conditions or Design Requirements

  • Turntable O.D.: φ350mm
  • External size (workbench): W 700 x D 600 x H 170 mm

Selection Criteria for Main Components

  • Select size for urethane molded bearings to support motions and to prevent deflection of the turntable.

Design Evaluation

Verification of main components

  • Verify bearing durability or life span based on load rating.
  • Calculate life span of the bearing
    • Life span for bearings (106 rotations): L = (Cr/Pr)³ , where
      Cr=7250N - Basic Dynamic load rating for B6906ZZ (from catalog)
      Pr- Radial Dynamic Equivalent load (need to calculate based on application loads)
    • Other conditionals values:
      Workpiece weight: M = 6 kg
      Gravitational acceleration: g = 9.8 m/s²
      Gravity by the workpiece: W = M x g = 6 x 9.8 = 59 N
      Manual force used to move turntable: Assume to be Q = 200 N
    • Radial Dynamic Equivalent load
      Pr =X×Fr + Y×Fa, where Fr-radial load, Fa-thrust load and X=1 and Y=2.3 are radial and thrust factor (values from catalog)
    • Assume that force acting on the bearing, Po = M + Q, acts only in the z-axis direction (thrust load), and let radial load Fr=0N, then we obtain the following:
      Thrust load: Fa=Po=M+Q=259N、then
      Pr=1×Fr+2.3×(M+Q)=1×0+2.3×259=596N
    • Bearing rated life L = (Cr/Pr)³ = (7250/596)³ = 1800 (10? rotations), has sufficient margin for our application.

Other Design Consideration

  • Securing repeatability of the turntable position and fixing the turntable with one bolt.
  • In this example two round locating pins are used for turntable positioning, combination of round and diamond pin can also be effectively used.

Part List

No. Part Name Sample Picture MISUMI Part Number
(click the Part Number below for details)
Quantity
1 Silicon Rubber / Urethane Molded Bearings - Threaded Arc UMSWRT5-16 3
2 Deep Groove/Double Shielded B6906ZZ 1
3 Retaining Rings/External/C-Type STWS30 1
4 Retaining Rings/Internal/C-Type RTWN47 1
5 Locating Pins - Large Head, Tapered (Press Fit) GJPBB4-6 1
6 Locating Pins - Large Head, Tapered (Press Fit) GJPDB4-6 1
7 Shoulder Bolts/Tolerance e9/EN 1.7220 Equiv. SMSB6.5-15 1
8 L Sheet Metal Mounting Plates/Brackets FALBS-SUD-T2.0-A22-B20-L20-X10-H16-N4-Y5-V10-S12-NA4 3
  • The part list above only contains MISUMI parts.
    Part list download (CSV) includes MISUMI and third party components used in this example.
  • TERMS AND CONDITIONS FOR USE OF CAD DATA
    Your access to the CAD data that MISUMI Corporation (hereinafter referred to as the Company) posts on this site (including 3D CAD data, intermediate 3D CAD data and 2D CAD data; hereinafter referred to as the Data) are of products manufactured and/or sold by the Company (hereinafter referred to as the Products) assumes that you have read and accepted these terms and conditions which govern your use of the Data. If you do not agree to these terms and conditions, you must stop using this website and the Data. You must not use the Data for any unlawful purpose or in any manner inconsistent with these terms and conditions.
    1. CAD Data
    The Data is prepared for assisting the Company's users in the CAD design process by providing dimensions and other Product information. In order to provide the best speed and stability working within this site, the Product drawings were simplified to reduce the size of the Data. For instance, some of the Products are shown without the oil groove shape, screws or spring shape. Also, please be aware that the tolerance, surface roughness and/or chamfer of the Data may vary from the actual Products.
    2. Disclaimer on Data
    While the Company has carefully prepared the Data, accuracy of the Data is not guaranteed and is subject to the variances as described above. The Company may also modify, add or delete the Data at any time without prior notice. The Company assumes no liability for any direct, indirect, consequential or special damages that you may claim resulted from your use of the Data or any changes to or deletions of the Data regardless of the reason. The Company provides no warranty as to the quality, accuracy, functionality, safety or reliability of the combination of Products and parts. Example applications and combinations of the Products are provided for illustrative purposes only.
    3. Copyright
    Copyrights to the content and the Data belong to the Company or the manufacturers of the Products. The said copyright is protected by the Copyright Act and international treaties. The use (including duplication, modification, uploading, posting, transmission, distribution, licensing, sales and publishing) of the Data except for the purpose to use the Data described above without prior approval of the Company is not allowed. The Data cannot be used for any purposes (including sales promotion) except for designing your machine. If you violate this provision or the laws or regulations, the Company may prohibit you from the use of the Data, the Company’s site and/or take legal action. So long as you comply with these terms and conditions, the Company grants to you a non-exclusive, non-transferable, revocable license to access and use the Data for the sole purpose of assisting you in designing machines that incorporate products.
    In case that the CAD data is found to have been to be used for any purpose other than mentioned above or against the related laws, MISUMI may take legal actions, including the one for blocking the involved user from using CAD data and from accessing to the MISUMI site.
    4. Disclaimer of Warranty
    ANY AND ALL CONTENT APPEARING ON THIS WEB SITE IS PROVIDED FOR INFORMATIONAL PURPOSES ONLY. THIS WEB SITE, ITS CONTENT AND ITS LINKS ARE PROVIDED ON AN "AS IS" AND "AS AVAILABLE" BASIS AND ARE USED ONLY AT YOUR SOLE RISK, TO THE FULLEST EXTENT PERMISSIBLE BY LAW. THE COMPANY DISCLAIMS ALL WARRANTIES, EXPRESS OR IMPLIED, OF ANY KIND, REGARDING THIS WEB SITE (INCLUDING ITS CONTENT, HARDWARE, SOFTWARE AND LINKS), INCLUDING AS TO FITNESS FOR A PARTICULAR PURPOSE, MERCHANTABILITY, TITLE, NON INFRINGEMENT, RESULTS, ACCURACY, COMPLETENESS, ACCESSIBILITY, COMPATIBILITY, SECURITY AND FREEDOM FROM COMPUTER VIRUS. THE COMPANY WILL NOT BE LIABLE FOR ANY DAMAGES OR LOSSES, INCLUDING DIRECT, INDIRECT, CONSEQUENTIAL, SPECIAL, INCIDENTAL OR PUNITIVE DAMAGES AND/OR LOST PROFITS, IN CONNECTION WITH USE OF THE INTERNET, THIS WEB SITE, ITS CONTENT OR ITS LINKS
    Further, the Company will not be liable to you for any failure or delay by the Company to provide access to the Data or any of its obligations under these terms and conditions where such failure or delay is the direct or indirect result of any circumstances beyond the Company's reasonable control (and the Company's obligations will be suspended for the duration of such circumstances).

    CAD Download (Unit Assembly)

    CAD Download: File Format
    生成

    Thank you for downloading the data.

    Click the Good IDEA! button when you find interesting design tips.


    This data is utilized in order to list more useful application examples in the future.

    CAD Data Limitations

    1. Assembly data shows the assembly drawings in the concept design phase. The sole purpose of the data is to explain the structure and functionality of the assembly and is not considered nor to be used as a final design.
      You will need to edit the Data so that it meets your specific design conditions.
    2. Unit assembly Data consists of some sub-assemblies.
      It is configured so that each sub-assembly unit can be used as it is or edited.
    3. * The part in the frame is a sub-assembly unit.

    4. The Data for fabricated parts is based on easy-to-edit dimensions and shapes in sketches and histories.
    5. The Data including the third-part components are made by the Company.

    Page top

Page top