(!)Due to Microsoft's end of support for Internet Explorer 11 on 15/06/2022, this site does not support the recommended environment.

ideanote
inCAD Library

Please read before use

What is inCAD Library?

  • Helpful application examples for mechanical engineers.

The Concept of inCAD Library

  • Online application library with a range of ideas for all manufacturing industries.
  • Save design time and learn new design applications when you are concepting new machines.

Disclaimer

  • MISUMI may not offer all parts in each application design. Available parts can only be purchased separately not as a unit shown in each application design.
  • MISUMI does not guarantee quality, accuracy, functionality, safety or reliability for the combination of the parts in each application example. Accept these points prior to use.
  • 2014 Copyright MISUMI
  • The data cannot be used for any purposes (including sales promotion) except for designing your machine.
  • All associated CAD is free. Misumi reserves the right at its sole discretion to cancel, terminate or modify this offer.
  • MISUMI may change, add or delete application examples posted without prior notice.
  • MISUMI assumes no responsibilities for any damage incurred resulting from your use of the Service or any change, addition or deletion by MISUMI of the application examples for any reason whatsoever.

inCAD Library Features

  1. Get great new design ideas for these application examples.
  2. Over 300 design application ideas
    collected from dozens of industries!

  3. Find application examples quickly! Search by function, workpiece shape, etc.

  4. Download the CAD models for each application example.
  5. Log in to download free CAD models.
    Download CAD for the entire application example!

Good IDEA! button

Click the Good IDEA! Button when you like an application example!

*Can only be clicked once per application example.

  • Upper right corner on the page of application example details

  • Pop-up dialog for CAD data downloading

Page top

Keyword Search
No. Search

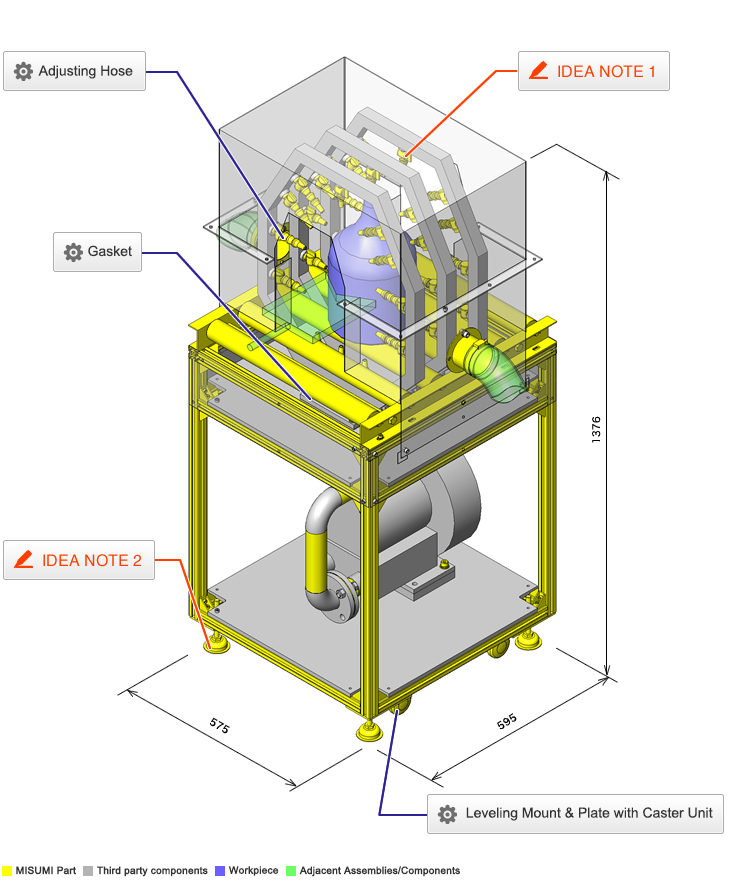
No.000122 Air Blow Mechanism

An air blow device that blows air from all directions.

Adjusting Hose

Product name Adjustable Hoses - Standard / L-Shaped / Branch
Part number HOSVA3-0-3-A1
Features Adjusting Hoses which can be bent to a right angle at an arbitrary portion
* Orange colored cells in the table below indicate the part numbers used in this example.

Selection criteria

Suitable for changing the air blow direction freely.

Back to page top.

Risk info.

Confirm that the required flow velocity has been secured.

Back to page top.

Available sizes

■Adjustable Hoses - Standard / L-Shaped / Branch

Connector Hose Nominal Hose Color Number of links Connector Thread Size (PT)
Threaded (select) Male Valve / Female Valve (fixed)
Threaded 2 Blue 0-30 1(R1/8)
2(R1/4)
2(R/Rc1/4)
Gray
Black
Male Valve 3 Blue 3(R3/8) 3(R/Rc3/8)
4(R1/2)
Female Valve 4 Gray 3(R3/8) 4(R/Rc1/2)
4(R1/2)

■Nozzle Shape.

■Shape A.

Hose
Nominal
A1 A2 A3
C C1 D d1 d2 d3 C C1 D d1 d2 d3 C C1 D d1 d2 d3
2 30.0 16.0 16.0 1.6 4.9 7.0 30.0 19.0 16.0 3.2 6.3 9.6 35.0 25.5 16.0 6.3 9.5 11.0
3 33.0 19.0 21.0 6.3 9.5 13.0 39.0 28.0 21.0 9.5 13.0 15.0 33.0 22.0 21.0 12.7 15.0 16.0
4 37.5 24.5 24.5 6.6 10.5 12.5 37.5 24.5 24.5 9.5 12.5 15.5 37.5 24.5 24.5 12.5 17.0 19.0

■Shape B.

Hose
Nominal
B1 B2 B3
C C1 D d1 d2 C C1 D d1 d2 C C1 D d1 d2
2 24.5 12.0 16.0 1.8 4.1 25.5 12.0 16.0 3.2 5.6 26.3 12.0 16.0 6.3 9.0
4 36.0 20.0 24.5 6.8 9.5 37.0 18.0 24.5 9.5 12.4 39.0 19.5 24.5 12.4 15.4

■Shape C.

Hose
Nominal
C1 C2
d1 F1 d1 F1
2 1.0 41.0 1.5 41.0

■Shape D.

Hose
Nominal
D1
C D d1 d2 d3 d4
2 26.4 16 3.2 1.7 25.4 26.8
3 39 22 5 3 32 34
4 50.5 25.0 6 4.5 44.5 48

■Shape M.

Hose
Nominal
M1 M2
A L (H) T Rc(PT) A L (H) T Rc(PT)
2 18.5 21 14 14 Rc1/8 22.5 25 17 10 Rc1/4

Unit(mm)

Back to page top

Performance info.

■Speeds / Loads (Load Info.) of Adjusting Hose.

■Withstanding Pressure.

Hose
Nominal
Withstanding Pressure MPa
Fluid Air
2 0.2 0.5
3 0.2 0.5
4 0.2 0.5

■Chemical Resistance.

Chemical Name A / NA
Solvent
Lubricant
Water
Acid ×
Alkali ×

Back to page top

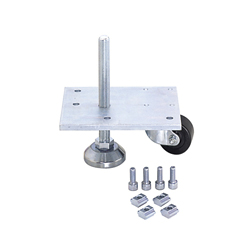
Leveling Mount & Plate with Caster Unit

Product name Leveling Mount & Plate - with Caster Unit
Part number HAJCHP6
Features Mounting Units for Casters / Leveling Mounts for Aluminum Extrusions.
* Orange colored cells in the table below indicate the part numbers used in this example.

Selection criteria

The design exclusively for aluminum extrusion allows for appropriate mounting.

Back to page top

Available sizes

■Leveling Mount & Plate - with Caster Unit

Aluminum extrusion sizes Caster types Plate Dimensions
(mm)
□20 Dual Wheel Swivel Type 135x75xt6
□40 Low Profile Swivel 100x125xt9
□30 Dual Wheel Swivel Type 135x75xt6
□40・□45 Low Profile Swivel 166x125xt9
□50 166x125xt9
□60 125x125xt9
□80 Medium Load Type 150x150xt12
□90 165x165xt12

Back to page top

Performance info.

■Speeds / Loads (Load Info.) of Leveling Mount + Plate with Caster Unit.

Aluminum extrusion sizes Caster
Allowable Load kN (kgf)
Leveling Mount
Allowable Load kN (kgf)
□20 0.9(100) 4.9(500)
□40 1.4(150) 16.6(1700)
□30 4.9(500)
□40・□45 16.6(1700)
□50 1.7(170)
□60 1.4(150)
□80 2.9(300) 39.2(4000)
□90

Back to page top

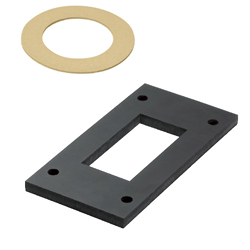
Gasket

Product name Rubber/Sponge Packings
Part number FRC4A2-A120-V49-Q95-N15
* Orange colored cells in the table below indicate the part numbers used in this example.

Selection criteria

Select to prevent air leakage and to enhance the efficiency.

Back to page top.

Available sizes

■Rubber/Sponge Packings

Material Hardness Color
Nitrile Rubber Shore A70 Black
Chloroprene Rubber Shore A65 Black
Amber Color Rubber Shore A45 Amber Color
Silicon Rubber Shore A70 Light Gray
Silicon Rubber Shore A50 Milky White
Fluororubber Shore A80 Black
Chloroprene Rubber Sponge Asker C25 Black
Fluororubber Sponge Asker C35 Black
Silicon Rubber Sponge Asker C35 Orange
Ethylene Rubber Shore A65 Black

■Sizes and Dimensions.

Thickness(mm) Configure in 1mm increments(Vertical ≧ Horizontal ≧ Thickness) 0.5mm Increment
Rubber Sponge Vertical(mm) Horizontal(mm) Hole Dia.(mm)
1 3

5

10
25 - 500
(when thickness = 30,
vertical ≧ 30)
25 - 500
(when thickness = 30,
horizontal ≧ 30)
3-30
2
3
5
10
15
20
30

Back to page top

IDEA NOTE Air blow from all directions

Due to air discharge nozzles arranged above, below and on the right and left of a workpiece, air is blown from all directions.

IDEA NOTE Can be installed in the middle of a line in a plant.

As this mechanism is equipped with leveling mounts with casters, it can be easily relocated and installed in the middle of a line due to the lack of walls on both sides.

  • TERMS AND CONDITIONS FOR USE OF CAD DATA
    Your access to the CAD data that MISUMI Corporation (hereinafter referred to as the Company) posts on this site (including 3D CAD data, intermediate 3D CAD data and 2D CAD data; hereinafter referred to as the Data) are of products manufactured and/or sold by the Company (hereinafter referred to as the Products) assumes that you have read and accepted these terms and conditions which govern your use of the Data. If you do not agree to these terms and conditions, you must stop using this website and the Data. You must not use the Data for any unlawful purpose or in any manner inconsistent with these terms and conditions.
    1. CAD Data
    The Data is prepared for assisting the Company's users in the CAD design process by providing dimensions and other Product information. In order to provide the best speed and stability working within this site, the Product drawings were simplified to reduce the size of the Data. For instance, some of the Products are shown without the oil groove shape, screws or spring shape. Also, please be aware that the tolerance, surface roughness and/or chamfer of the Data may vary from the actual Products.
    2. Disclaimer on Data
    While the Company has carefully prepared the Data, accuracy of the Data is not guaranteed and is subject to the variances as described above. The Company may also modify, add or delete the Data at any time without prior notice. The Company assumes no liability for any direct, indirect, consequential or special damages that you may claim resulted from your use of the Data or any changes to or deletions of the Data regardless of the reason. The Company provides no warranty as to the quality, accuracy, functionality, safety or reliability of the combination of Products and parts. Example applications and combinations of the Products are provided for illustrative purposes only.
    3. Copyright
    Copyrights to the content and the Data belong to the Company or the manufacturers of the Products. The said copyright is protected by the Copyright Act and international treaties. The use (including duplication, modification, uploading, posting, transmission, distribution, licensing, sales and publishing) of the Data except for the purpose to use the Data described above without prior approval of the Company is not allowed. The Data cannot be used for any purposes (including sales promotion) except for designing your machine. If you violate this provision or the laws or regulations, the Company may prohibit you from the use of the Data, the Company’s site and/or take legal action. So long as you comply with these terms and conditions, the Company grants to you a non-exclusive, non-transferable, revocable license to access and use the Data for the sole purpose of assisting you in designing machines that incorporate products.
    In case that the CAD data is found to have been to be used for any purpose other than mentioned above or against the related laws, MISUMI may take legal actions, including the one for blocking the involved user from using CAD data and from accessing to the MISUMI site.
    4. Disclaimer of Warranty
    ANY AND ALL CONTENT APPEARING ON THIS WEB SITE IS PROVIDED FOR INFORMATIONAL PURPOSES ONLY. THIS WEB SITE, ITS CONTENT AND ITS LINKS ARE PROVIDED ON AN "AS IS" AND "AS AVAILABLE" BASIS AND ARE USED ONLY AT YOUR SOLE RISK, TO THE FULLEST EXTENT PERMISSIBLE BY LAW. THE COMPANY DISCLAIMS ALL WARRANTIES, EXPRESS OR IMPLIED, OF ANY KIND, REGARDING THIS WEB SITE (INCLUDING ITS CONTENT, HARDWARE, SOFTWARE AND LINKS), INCLUDING AS TO FITNESS FOR A PARTICULAR PURPOSE, MERCHANTABILITY, TITLE, NON INFRINGEMENT, RESULTS, ACCURACY, COMPLETENESS, ACCESSIBILITY, COMPATIBILITY, SECURITY AND FREEDOM FROM COMPUTER VIRUS. THE COMPANY WILL NOT BE LIABLE FOR ANY DAMAGES OR LOSSES, INCLUDING DIRECT, INDIRECT, CONSEQUENTIAL, SPECIAL, INCIDENTAL OR PUNITIVE DAMAGES AND/OR LOST PROFITS, IN CONNECTION WITH USE OF THE INTERNET, THIS WEB SITE, ITS CONTENT OR ITS LINKS
    Further, the Company will not be liable to you for any failure or delay by the Company to provide access to the Data or any of its obligations under these terms and conditions where such failure or delay is the direct or indirect result of any circumstances beyond the Company's reasonable control (and the Company's obligations will be suspended for the duration of such circumstances).

    CAD Download (Unit Assembly)

    CAD Download: File Format
    生成

    Thank you for downloading the data.

    Click the Good IDEA! button when you find interesting design tips.


    This data is utilized in order to list more useful application examples in the future.

    CAD Data Limitations

    1. Assembly data shows the assembly drawings in the concept design phase. The sole purpose of the data is to explain the structure and functionality of the assembly and is not considered nor to be used as a final design.
      You will need to edit the Data so that it meets your specific design conditions.
    2. Unit assembly Data consists of some sub-assemblies.
      It is configured so that each sub-assembly unit can be used as it is or edited.
    3. * The part in the frame is a sub-assembly unit.

    4. The Data for fabricated parts is based on easy-to-edit dimensions and shapes in sketches and histories.
    5. The Data including the third-part components are made by the Company.

    Page top

  • * Unit assembly Data consists of some sub-assemblies.
       It is configured so that each sub-assembly unit can be used as it is or edited.

Application Overview

Purpose

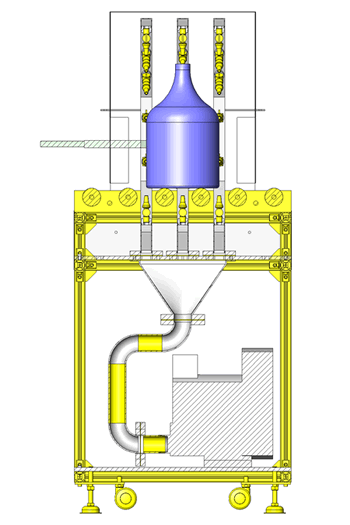
  • A structure in which dust is removed from a workpiece utilizing ring blower from all directions while the workpiece is transferred by a conveyor.

Points for use

  • Workpiece is automatically moved onto the conveyor using a pusher from previous station.
  • At air blow station cover is used to prevent dust from contaminating surrounding areas.

Target workpiece

  • Bottle in bowling pin shape (resin).
  • Outer dimensions: D200 x H340mm.
  • Workpiece weight: 570g.
  • Workpiece volume: 0.0065 m³ -> 6.5L.

Design Specifications

Operating Conditions or Design Requirements

  • Outer dimensions: W608 x D628 x H1376mm.
  • Conveyor length: 595mm.
  • Conveyor roller strength: 273N.

Required Performance

  • Ring blower air discharge amount: 2.5m³/min at maximum.
  • Air volume discharged from one nozzle: 0.0694m³/min.
  • Air speed discharged from one nozzle: 37.11m/s.

Selection Criteria for Main Components

  • Conveyor.
    • A conveyor that can withstand the weight of workpieces filled with water is selected.
    • Workpiece weight 5.7N + water 65N = 70.7N < conveyor roller strength 273N.
  • Nozzle (adjusting hose).
    • Two types of nozzles with different hose lengths are selected so that the entire surface of the workpiece is blown.
  • Ring blower.
    • A ring blower is selected to address the number of nozzles.

Design Evaluation

Verification of main components

  • [Air speed is verified based on the air volume per nozzle.]
  • [Air volume<per nozzle>.]
    • Air volume = ring blower air discharge amount/number of nozzles = 0.0694m³/min.
  • [Air speed<per nozzle>.]
    • From the nozzle outlet diameter of φ6.3mm, the nozzle outlet sectional area is,
      sectional area = (3.15 x 10⁻³)² x π = 3.117 x 10⁻⁵m².
    • Air speed = air volume/(nozzle outlet sectional area x 60)
      =0.0694/(3.117x10⁻⁵×60)=37.11m/s.

Other Design Consideration

  • Adjusting hoses are used so that the air blow directions can be adjusted on site.

Explore Similar Application Examples

Page - / -

Part List

No. Part Name Sample Picture MISUMI Part Number
(click the Part Number below for details)
Quantity
1 Rollers ROCOP50-6-513-100 1
2 Adjustment Hoses HOSVA3-0-3-A1 20
3 Adjustment Hoses HOSVA3-2-3-A1 16
4 Aluminum Extrusion HFS6-3030-515 6
5 Aluminum Extrusion HFS6-3030-535 4
6 Aluminum Extrusion HFS6-3030-595 2
7 Aluminum Extrusion HFS6-3030-710 4
8 Leveling Mount with Caster HAJCHP6 4
9 Steel Pipes SUTD40A-60 1
10 Steel Pipes SUTC40A-65 1
11 Steel Pipes SUTC40A-163 1
12 Brackets for Aluminum Extrusion HBLFSN6-SSU 40
13 Chloroprene Rubber Sheet FRC4A2-A120-V49-Q95-N15 2
14 Chloroprene Rubber Sheet FRC4H2-A170-B90-W91-V32-F145-G65-N11 3
15 Chloroprene Rubber Sheet FRC6H2-A290-B149-W234-V93-F132.5-G124-N7 1
16 Nuts For Aluminum Extrusion HNTT6-6 32
17 Nuts For Aluminum Extrusion HNTU6-6 16
18 Flanges For Duct Hoses HOFS75 2
19 Socket Head Cap Screws-with Washer SCBS6-12 8
20 Bands For Hose HOSBS60N 2
  • The part list above only contains MISUMI parts.
    Part list download (CSV) includes MISUMI and third party components used in this example.
  • TERMS AND CONDITIONS FOR USE OF CAD DATA
    Your access to the CAD data that MISUMI Corporation (hereinafter referred to as the Company) posts on this site (including 3D CAD data, intermediate 3D CAD data and 2D CAD data; hereinafter referred to as the Data) are of products manufactured and/or sold by the Company (hereinafter referred to as the Products) assumes that you have read and accepted these terms and conditions which govern your use of the Data. If you do not agree to these terms and conditions, you must stop using this website and the Data. You must not use the Data for any unlawful purpose or in any manner inconsistent with these terms and conditions.
    1. CAD Data
    The Data is prepared for assisting the Company's users in the CAD design process by providing dimensions and other Product information. In order to provide the best speed and stability working within this site, the Product drawings were simplified to reduce the size of the Data. For instance, some of the Products are shown without the oil groove shape, screws or spring shape. Also, please be aware that the tolerance, surface roughness and/or chamfer of the Data may vary from the actual Products.
    2. Disclaimer on Data
    While the Company has carefully prepared the Data, accuracy of the Data is not guaranteed and is subject to the variances as described above. The Company may also modify, add or delete the Data at any time without prior notice. The Company assumes no liability for any direct, indirect, consequential or special damages that you may claim resulted from your use of the Data or any changes to or deletions of the Data regardless of the reason. The Company provides no warranty as to the quality, accuracy, functionality, safety or reliability of the combination of Products and parts. Example applications and combinations of the Products are provided for illustrative purposes only.
    3. Copyright
    Copyrights to the content and the Data belong to the Company or the manufacturers of the Products. The said copyright is protected by the Copyright Act and international treaties. The use (including duplication, modification, uploading, posting, transmission, distribution, licensing, sales and publishing) of the Data except for the purpose to use the Data described above without prior approval of the Company is not allowed. The Data cannot be used for any purposes (including sales promotion) except for designing your machine. If you violate this provision or the laws or regulations, the Company may prohibit you from the use of the Data, the Company’s site and/or take legal action. So long as you comply with these terms and conditions, the Company grants to you a non-exclusive, non-transferable, revocable license to access and use the Data for the sole purpose of assisting you in designing machines that incorporate products.
    In case that the CAD data is found to have been to be used for any purpose other than mentioned above or against the related laws, MISUMI may take legal actions, including the one for blocking the involved user from using CAD data and from accessing to the MISUMI site.
    4. Disclaimer of Warranty
    ANY AND ALL CONTENT APPEARING ON THIS WEB SITE IS PROVIDED FOR INFORMATIONAL PURPOSES ONLY. THIS WEB SITE, ITS CONTENT AND ITS LINKS ARE PROVIDED ON AN "AS IS" AND "AS AVAILABLE" BASIS AND ARE USED ONLY AT YOUR SOLE RISK, TO THE FULLEST EXTENT PERMISSIBLE BY LAW. THE COMPANY DISCLAIMS ALL WARRANTIES, EXPRESS OR IMPLIED, OF ANY KIND, REGARDING THIS WEB SITE (INCLUDING ITS CONTENT, HARDWARE, SOFTWARE AND LINKS), INCLUDING AS TO FITNESS FOR A PARTICULAR PURPOSE, MERCHANTABILITY, TITLE, NON INFRINGEMENT, RESULTS, ACCURACY, COMPLETENESS, ACCESSIBILITY, COMPATIBILITY, SECURITY AND FREEDOM FROM COMPUTER VIRUS. THE COMPANY WILL NOT BE LIABLE FOR ANY DAMAGES OR LOSSES, INCLUDING DIRECT, INDIRECT, CONSEQUENTIAL, SPECIAL, INCIDENTAL OR PUNITIVE DAMAGES AND/OR LOST PROFITS, IN CONNECTION WITH USE OF THE INTERNET, THIS WEB SITE, ITS CONTENT OR ITS LINKS
    Further, the Company will not be liable to you for any failure or delay by the Company to provide access to the Data or any of its obligations under these terms and conditions where such failure or delay is the direct or indirect result of any circumstances beyond the Company's reasonable control (and the Company's obligations will be suspended for the duration of such circumstances).

    CAD Download (Unit Assembly)

    CAD Download: File Format
    生成

    Thank you for downloading the data.

    Click the Good IDEA! button when you find interesting design tips.


    This data is utilized in order to list more useful application examples in the future.

    CAD Data Limitations

    1. Assembly data shows the assembly drawings in the concept design phase. The sole purpose of the data is to explain the structure and functionality of the assembly and is not considered nor to be used as a final design.
      You will need to edit the Data so that it meets your specific design conditions.
    2. Unit assembly Data consists of some sub-assemblies.
      It is configured so that each sub-assembly unit can be used as it is or edited.
    3. * The part in the frame is a sub-assembly unit.

    4. The Data for fabricated parts is based on easy-to-edit dimensions and shapes in sketches and histories.
    5. The Data including the third-part components are made by the Company.

    Page top

Page top