(!)Due to Microsoft's end of support for Internet Explorer 11 on 15/06/2022, this site does not support the recommended environment.

ideanote
inCAD Library

Please read before use

What is inCAD Library?

  • Helpful application examples for mechanical engineers.

The Concept of inCAD Library

  • Online application library with a range of ideas for all manufacturing industries.
  • Save design time and learn new design applications when you are concepting new machines.

Disclaimer

  • MISUMI may not offer all parts in each application design. Available parts can only be purchased separately not as a unit shown in each application design.
  • MISUMI does not guarantee quality, accuracy, functionality, safety or reliability for the combination of the parts in each application example. Accept these points prior to use.
  • 2014 Copyright MISUMI
  • The data cannot be used for any purposes (including sales promotion) except for designing your machine.
  • All associated CAD is free. Misumi reserves the right at its sole discretion to cancel, terminate or modify this offer.
  • MISUMI may change, add or delete application examples posted without prior notice.
  • MISUMI assumes no responsibilities for any damage incurred resulting from your use of the Service or any change, addition or deletion by MISUMI of the application examples for any reason whatsoever.

inCAD Library Features

  1. Get great new design ideas for these application examples.
  2. Over 300 design application ideas
    collected from dozens of industries!

  3. Find application examples quickly! Search by function, workpiece shape, etc.

  4. Download the CAD models for each application example.
  5. Log in to download free CAD models.
    Download CAD for the entire application example!

Good IDEA! button

Click the Good IDEA! Button when you like an application example!

*Can only be clicked once per application example.

  • Upper right corner on the page of application example details

  • Pop-up dialog for CAD data downloading

Page top

Keyword Search
No. Search

No.000229 Swing Clamp

Clamps and rotates workpiece in a swing motion.

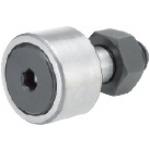
Cam Followers

Product name Cam Followers - Hex Hole, No Seal, Crown Type
Part number CFUA6-16
* Orange colored cells in the table below indicate the part numbers used in this example.

Selection criteria

In order to configure a knuckle joint to support rotating object.

Back to page top

Available sizes

■Cam Followers - Hex Hole, No Seal, Crown Type

Applications Body Nut
Material Seal Material Surface Treatment
Not provided Provided
General 52100 Bearing Steel 1045 Carbon Steel Black Oxide Coating
440C Stainless Steel 304 Stainless Steel -
Low Dust Generation -

■Sizes and Dimensions

Stud Dia. Thread diameter x pitch Outer Ring Diameter Outer Ring Width Overall Length
φ3 M3×0.5 φ10 7 17
φ4 M4×0.7 φ12 8 20
φ5 M5×0.8 φ13 9 23
φ6 M6×1.0 φ16 11 28
φ8 M8x1.25 φ19 11 32
φ10 M10x1.25 φ22 12 36
φ26
φ12 M12x1.5 φ30 14 40
φ32

Back to page top

Accuracy Info

■Cam Follower Accuracy

Stud Diameter Tolerance:  h7.

Outer Ring Width Tolerance:  0/-0.12.

Outer Ring Diameter Tolerance:

Outer Ring Diameter Tolerance
φ10 0/-0.008
φ12
φ13
φ16
φ19 0/-0.009
φ22
φ26
φ30
φ32 0/-0.011

■Rated load and rotation speed of cam follower

Stud Dia.
- Outer Ring Dia.
Basic
Dynamic Load Rating
C (kN)
Basic
Static Load Rating
Cor (kN)
Max.
Allowable Load
(kN)
Track
Load Capacity
(kN)
Max. Rotational Speed (rpm)
With Seal No Seal
φ3−φ10 1.47 1.18 0.36 1.37 32900 47000
φ4−φ12 2.06 2.05 0.78 1.76 25900 37000
φ5−φ13 3.14 2.77 1.42 2.25 20300 29000
φ6−φ16 3.59 3.58 2.11 3.43 17500 25000
φ8−φ19 4.17 4.65 4.73 4.02 14000 20000
φ10−φ22 5.33 6.78 5.81 4.7 11900 17000
φ10−φ26 5.49
φ12−φ30 7.87 9.79 9.37 7.06 9800 14000
φ12−φ32 7.45

Back to page top

Ball Spline

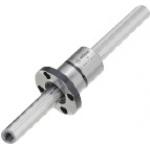
Product name Ball Splines - Both Ends Tapped
Part number BSFM16-335-M8-NTW
* Orange colored cells in the table below indicate the part numbers used in this example.

Selection criteria

Selection to realize unit for rotation and linear motion simultaneously in a compact manner.

Back to page top

Available sizes

■Ball Splines - Both Ends Tapped

Material
Spline Shaft : 52100 Bearing Steel
Nut : 4115 Alloy Steel
Hardness 58HRC or more
Spline Shaft : 440C Stainless Steel
Nut : 440C Stainless Steel
Hardness 55HRC or more
With Round Flange Nut
With Compact Flange Nut -
With Straight Nut -

■Sizes and Dimensions

Nominal Spline Shaft Length Tap Dia. Shaft O.D.
3 4 5 6 8 10 12 16
6 60-400 - - - - - - - 6
8 60-400 - - - - - - 8
10 60-600 - - - - - 10.4
13 60-600 - - - - - 13.4
16 70-600 - - - - 16.6
20 80-700 - - - - 20.6
25 90-900 - - - 25.8
30 100-1150 - - - 30.8

Back to page top

Selection steps

■Selection Steps of Ball Spline

Determining conditions of use.
(Load, Torque, Feed distance, Life).

Temporary selection of specification of ball spline.
(Spline shaft diameter, spline shaft length and overall length are temporary determined in accordance with application condition).

Basic Safety Check.
  • ●Allowable Load.
  • ●Service Life.

Back to page top

Accuracy Info

■Accuracy of Ball Spline Shaft

(μm)

Name
No.
Spline
Shaft Diameter
Max.
Runout of
Nut O.D.
Max. Runout of Spline Axis Line
Length -200 201-315 316-400 401-500 501-630 630-800 801-1000 1001-
6 φ6 11 46 89 126 163 - - - -
8 φ8
10 φ10.4 13 36 54 68 82 102 - - -
13 φ13.4 16 34 45 53 62 75 - - -
16 φ16.6
20 φ20.6 19 32 39 44 50 57 68 83 102
25 φ25.8
30 φ30.8

Back to page top

Performance info.

■Rated Load of Ball Spline

Name
No.
Basic rated Torque Basic Load Rating Allowable Static Moment
Dynamic (Nm) Static (Nm) Dynamic (kN) Static (kN) M 01 (N・m) M 02 (N・m)
6 3.8 7 1.2 2.1 5 36
8 4.8 8.7 1.2 2.1 5 36
10 19 34 3.8 6.9 26 181
13 28 52 4.6 8.3 36 251
16 51 93 6.2 11.1 56 386
20 85 154 8.5 15.3 83 611
25 193 348 15.4 27.7 173 1248
30 272 490 18.5 33.3 212 1581

Back to page top

Technical Calculations

■Calculation of Service Life of Ball Spline

Use the following formula for calculating the running service life of the ball spline.

• Radial Load

• Torque Load

  • L: Running Life (km).
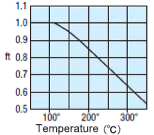
  • ft: Temperature Factor.
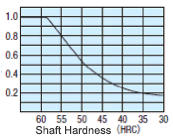
  • fh: Hardness Factor.
  • fp: Ratio of Rated Load.
  • fw: Load Factor.
  • L0: Rated Life (50km).
  • C: Basic Dynamic Load Rating (N).
  • F: Applied Radial Load (N).
  • Ct: Basic Dynamic Torque (N·m).
  • T: Applied Torque (N·m).

Use the following formula for calculating the service life of the ball spline.

  • Lh: Run Time (hr).
  • L: Running Life (km).
  • St: Stroke Length (mm).
  • n: Reciprocating Cycles per Minute (cpm).

■Temperature Factor (ft)

■Hardness Factor (fh)

■Ratio of Rated Load (fp)

Name No. Spline Shaft Diameter. Load Divided Direct Download
10 φ10.4 1 0.71
13 φ13.4 1 0.71
16 φ16.6 1 0.68

■Load Factor (fw)

Usage Condition Load Factor (fw)
Minimal vibrations
shocks (slow speed travel 1 to 2 15 m/min or less)
1-2
Some vibrations
shocks(medium speed travel 2 to 3 60 m/min or less)
2-3
Severe vibrations
shocks (high speed travel 3 or more over 60m/min.)
3-

Back to page top

IDEA NOTE A ball spline mechanism that works as a guide

The ball spline not only allows for up and down motion, but also shaft rotary motion for guiding and transferring of workpiece.

IDEA NOTE Clamping work center

The rotation clamp is designed as a mechanism to allow for positioning adjustments.

  • TERMS AND CONDITIONS FOR USE OF CAD DATA
    Your access to the CAD data that MISUMI Corporation (hereinafter referred to as the Company) posts on this site (including 3D CAD data, intermediate 3D CAD data and 2D CAD data; hereinafter referred to as the Data) are of products manufactured and/or sold by the Company (hereinafter referred to as the Products) assumes that you have read and accepted these terms and conditions which govern your use of the Data. If you do not agree to these terms and conditions, you must stop using this website and the Data. You must not use the Data for any unlawful purpose or in any manner inconsistent with these terms and conditions.
    1. CAD Data
    The Data is prepared for assisting the Company's users in the CAD design process by providing dimensions and other Product information. In order to provide the best speed and stability working within this site, the Product drawings were simplified to reduce the size of the Data. For instance, some of the Products are shown without the oil groove shape, screws or spring shape. Also, please be aware that the tolerance, surface roughness and/or chamfer of the Data may vary from the actual Products.
    2. Disclaimer on Data
    While the Company has carefully prepared the Data, accuracy of the Data is not guaranteed and is subject to the variances as described above. The Company may also modify, add or delete the Data at any time without prior notice. The Company assumes no liability for any direct, indirect, consequential or special damages that you may claim resulted from your use of the Data or any changes to or deletions of the Data regardless of the reason. The Company provides no warranty as to the quality, accuracy, functionality, safety or reliability of the combination of Products and parts. Example applications and combinations of the Products are provided for illustrative purposes only.
    3. Copyright
    Copyrights to the content and the Data belong to the Company or the manufacturers of the Products. The said copyright is protected by the Copyright Act and international treaties. The use (including duplication, modification, uploading, posting, transmission, distribution, licensing, sales and publishing) of the Data except for the purpose to use the Data described above without prior approval of the Company is not allowed. The Data cannot be used for any purposes (including sales promotion) except for designing your machine. If you violate this provision or the laws or regulations, the Company may prohibit you from the use of the Data, the Company’s site and/or take legal action. So long as you comply with these terms and conditions, the Company grants to you a non-exclusive, non-transferable, revocable license to access and use the Data for the sole purpose of assisting you in designing machines that incorporate products.
    In case that the CAD data is found to have been to be used for any purpose other than mentioned above or against the related laws, MISUMI may take legal actions, including the one for blocking the involved user from using CAD data and from accessing to the MISUMI site.
    4. Disclaimer of Warranty
    ANY AND ALL CONTENT APPEARING ON THIS WEB SITE IS PROVIDED FOR INFORMATIONAL PURPOSES ONLY. THIS WEB SITE, ITS CONTENT AND ITS LINKS ARE PROVIDED ON AN "AS IS" AND "AS AVAILABLE" BASIS AND ARE USED ONLY AT YOUR SOLE RISK, TO THE FULLEST EXTENT PERMISSIBLE BY LAW. THE COMPANY DISCLAIMS ALL WARRANTIES, EXPRESS OR IMPLIED, OF ANY KIND, REGARDING THIS WEB SITE (INCLUDING ITS CONTENT, HARDWARE, SOFTWARE AND LINKS), INCLUDING AS TO FITNESS FOR A PARTICULAR PURPOSE, MERCHANTABILITY, TITLE, NON INFRINGEMENT, RESULTS, ACCURACY, COMPLETENESS, ACCESSIBILITY, COMPATIBILITY, SECURITY AND FREEDOM FROM COMPUTER VIRUS. THE COMPANY WILL NOT BE LIABLE FOR ANY DAMAGES OR LOSSES, INCLUDING DIRECT, INDIRECT, CONSEQUENTIAL, SPECIAL, INCIDENTAL OR PUNITIVE DAMAGES AND/OR LOST PROFITS, IN CONNECTION WITH USE OF THE INTERNET, THIS WEB SITE, ITS CONTENT OR ITS LINKS
    Further, the Company will not be liable to you for any failure or delay by the Company to provide access to the Data or any of its obligations under these terms and conditions where such failure or delay is the direct or indirect result of any circumstances beyond the Company's reasonable control (and the Company's obligations will be suspended for the duration of such circumstances).

    CAD Download (Unit Assembly)

    CAD Download: File Format
    生成

    Thank you for downloading the data.

    Click the Good IDEA! button when you find interesting design tips.


    This data is utilized in order to list more useful application examples in the future.

    CAD Data Limitations

    1. Assembly data shows the assembly drawings in the concept design phase. The sole purpose of the data is to explain the structure and functionality of the assembly and is not considered nor to be used as a final design.
      You will need to edit the Data so that it meets your specific design conditions.
    2. Unit assembly Data consists of some sub-assemblies.
      It is configured so that each sub-assembly unit can be used as it is or edited.
    3. * The part in the frame is a sub-assembly unit.

    4. The Data for fabricated parts is based on easy-to-edit dimensions and shapes in sketches and histories.
    5. The Data including the third-part components are made by the Company.

    Page top

  • * Unit assembly Data consists of some sub-assemblies.
       It is configured so that each sub-assembly unit can be used as it is or edited.

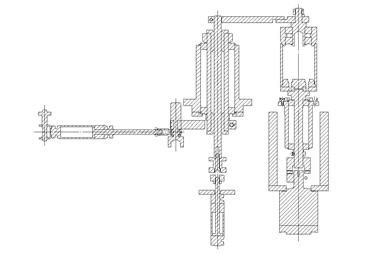
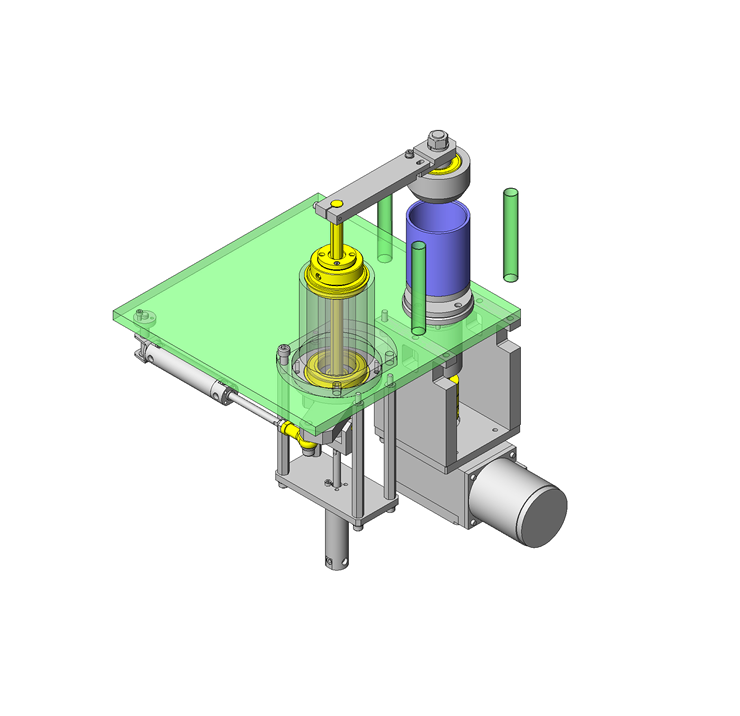
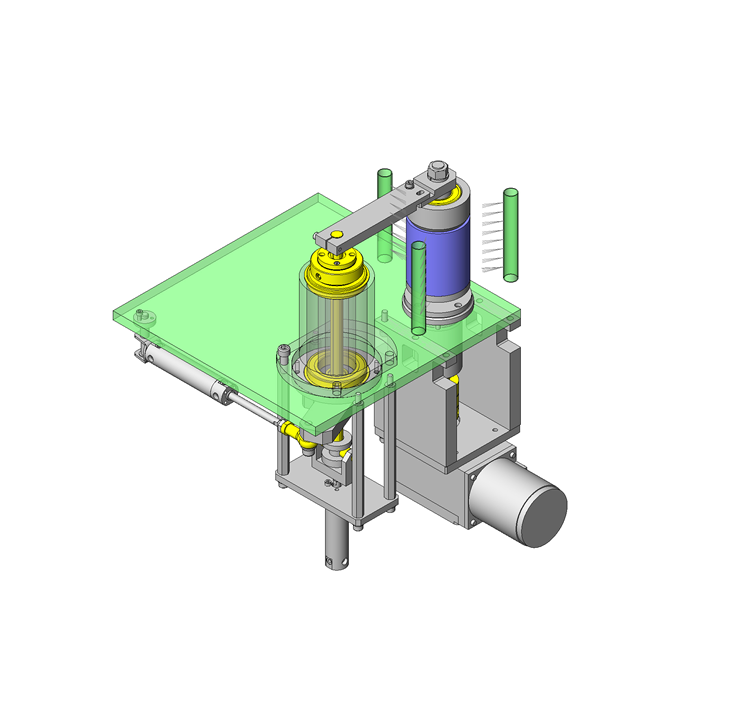
Application Overview

Purpose

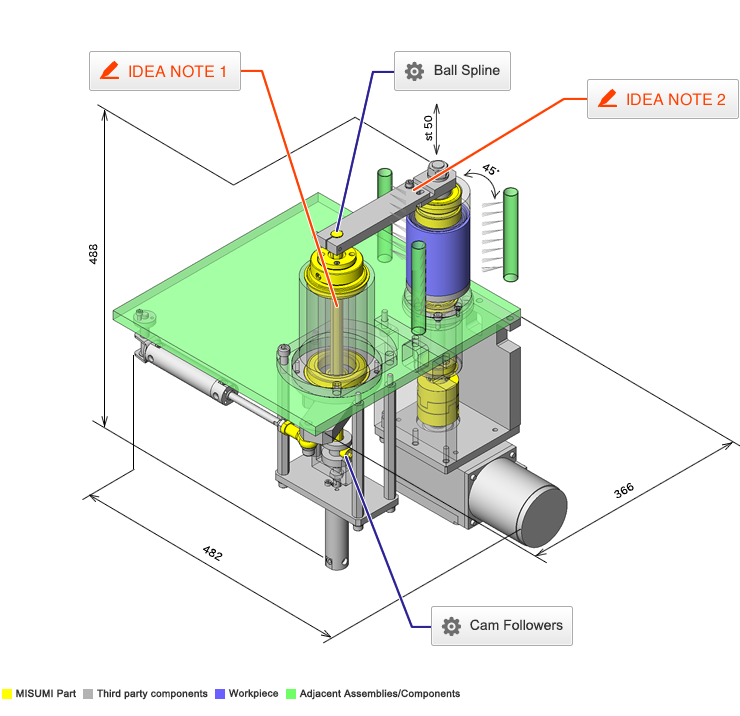
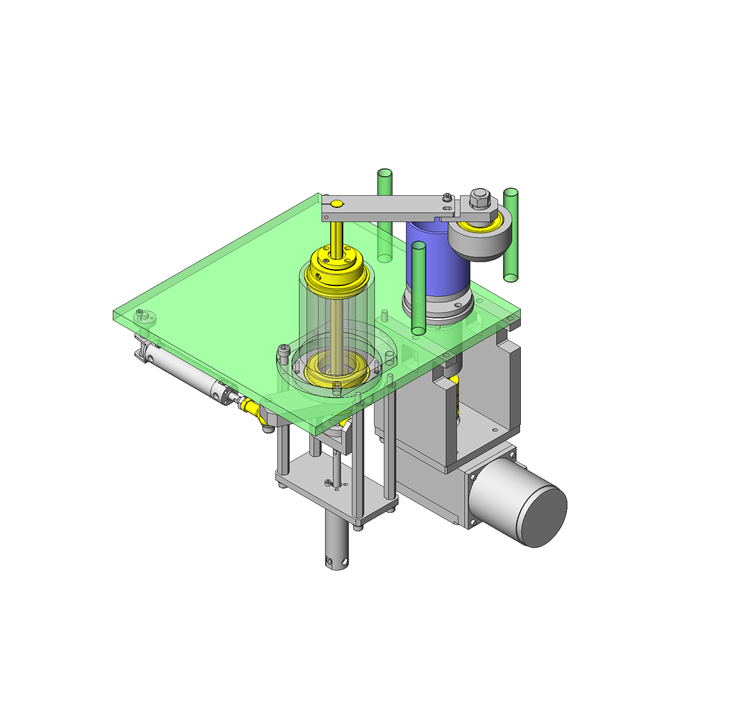
  • Cleans work surface by blowing out dirt using air while the workpiece is being rotated.
    The workpiece is placed on a rotating table while the arm is lowered to clamp it down.

Target workpiece

  • Shape: Cylinder case
  • Size:φ85 x L 102 x t 5mm
  • Weight: 1kg

Design Specifications

Operating Conditions or Design Requirements

  • External dimensions: W 366 x D 482 x H 488mm
  • Arm swing angle: +/- 45°
  • Clam stroke: 50mm
  • Work rotation speed: 75rpm or more

Required Performance

  • Clamp section weight: 2kg

Selection Criteria for Main Components

  • Select a φ25 cylinder in order to lift clamp section 2kg.
  • Select motor of 40 W, reduction ratio 1/80 in order to rotate workpiece at 75rpm or more.

Design Evaluation

Verification of main components

  • Verifying permissible motor moment of inertia based on load inertia.
    • Checking load moment of inertia: J.
      Coupling moment of inertia:Jc=11×10 -5kg・㎡
      Set Collar moment of inertia: Js = mD²/8=0.095×(0.032)²/8=1.2×10-5kg・㎡
      Workpiece moment of inertia: JW = mD²/8=1×(0.085)²/8=90×10-5kg・㎡
      Rotating Shaft moment of inertia: J1 = mD²/8=0.9×(0.028)²/8=8.9×10-5kg・㎡
      Workpiece lower side holder section moment of inertia: J2=mD²/8=1.3×(0.085)²/8=120×10-5kg・㎡
      Workpiece upper side holder section moment of inertia: J3=mD²/8=2.1×(0.085)²/8=190×10-5kg・㎡
      Total: J = Jc + Js + JW + J1 + J2 + J3 = 421 x 10-5kg・m² < 3000 x 10-5kg・m2 = Permissible moment of inertia for motor: JM
      ⇒No problem

Other Design Consideration

  • The clamp arm is set to be capable of rotating 45° in order to avoid interference with the clamp while setting the workpiece.

Explore Similar Application Examples

Page - / -

Part List

No. Part Name Sample Picture MISUMI Part Number
(click the Part Number below for details)
Quantity
1 Rod End Bearings PHSC10A 1
2 Cam Followers CFUA6-16 2
3 Shaft Collars SCCN50-22 1
4 Shaft Collars SCSBS20-24 1
5 Retaining Rings-External STWN30 1
6 Retaining Rings-External STWN10 1
7 Ball Bearing B6204ZZNR 2
8 Ball Bearing B6010ZZNR 2
9 Deep Groove Ball Bearings B6206ZZ 2
10 Couplings MFJC55-20-22 1
11 Ball Spline BSFM16-335-M8-NTW 1
  • The part list above only contains MISUMI parts.
    Part list download (CSV) includes MISUMI and third party components used in this example.
  • TERMS AND CONDITIONS FOR USE OF CAD DATA
    Your access to the CAD data that MISUMI Corporation (hereinafter referred to as the Company) posts on this site (including 3D CAD data, intermediate 3D CAD data and 2D CAD data; hereinafter referred to as the Data) are of products manufactured and/or sold by the Company (hereinafter referred to as the Products) assumes that you have read and accepted these terms and conditions which govern your use of the Data. If you do not agree to these terms and conditions, you must stop using this website and the Data. You must not use the Data for any unlawful purpose or in any manner inconsistent with these terms and conditions.
    1. CAD Data
    The Data is prepared for assisting the Company's users in the CAD design process by providing dimensions and other Product information. In order to provide the best speed and stability working within this site, the Product drawings were simplified to reduce the size of the Data. For instance, some of the Products are shown without the oil groove shape, screws or spring shape. Also, please be aware that the tolerance, surface roughness and/or chamfer of the Data may vary from the actual Products.
    2. Disclaimer on Data
    While the Company has carefully prepared the Data, accuracy of the Data is not guaranteed and is subject to the variances as described above. The Company may also modify, add or delete the Data at any time without prior notice. The Company assumes no liability for any direct, indirect, consequential or special damages that you may claim resulted from your use of the Data or any changes to or deletions of the Data regardless of the reason. The Company provides no warranty as to the quality, accuracy, functionality, safety or reliability of the combination of Products and parts. Example applications and combinations of the Products are provided for illustrative purposes only.
    3. Copyright
    Copyrights to the content and the Data belong to the Company or the manufacturers of the Products. The said copyright is protected by the Copyright Act and international treaties. The use (including duplication, modification, uploading, posting, transmission, distribution, licensing, sales and publishing) of the Data except for the purpose to use the Data described above without prior approval of the Company is not allowed. The Data cannot be used for any purposes (including sales promotion) except for designing your machine. If you violate this provision or the laws or regulations, the Company may prohibit you from the use of the Data, the Company’s site and/or take legal action. So long as you comply with these terms and conditions, the Company grants to you a non-exclusive, non-transferable, revocable license to access and use the Data for the sole purpose of assisting you in designing machines that incorporate products.
    In case that the CAD data is found to have been to be used for any purpose other than mentioned above or against the related laws, MISUMI may take legal actions, including the one for blocking the involved user from using CAD data and from accessing to the MISUMI site.
    4. Disclaimer of Warranty
    ANY AND ALL CONTENT APPEARING ON THIS WEB SITE IS PROVIDED FOR INFORMATIONAL PURPOSES ONLY. THIS WEB SITE, ITS CONTENT AND ITS LINKS ARE PROVIDED ON AN "AS IS" AND "AS AVAILABLE" BASIS AND ARE USED ONLY AT YOUR SOLE RISK, TO THE FULLEST EXTENT PERMISSIBLE BY LAW. THE COMPANY DISCLAIMS ALL WARRANTIES, EXPRESS OR IMPLIED, OF ANY KIND, REGARDING THIS WEB SITE (INCLUDING ITS CONTENT, HARDWARE, SOFTWARE AND LINKS), INCLUDING AS TO FITNESS FOR A PARTICULAR PURPOSE, MERCHANTABILITY, TITLE, NON INFRINGEMENT, RESULTS, ACCURACY, COMPLETENESS, ACCESSIBILITY, COMPATIBILITY, SECURITY AND FREEDOM FROM COMPUTER VIRUS. THE COMPANY WILL NOT BE LIABLE FOR ANY DAMAGES OR LOSSES, INCLUDING DIRECT, INDIRECT, CONSEQUENTIAL, SPECIAL, INCIDENTAL OR PUNITIVE DAMAGES AND/OR LOST PROFITS, IN CONNECTION WITH USE OF THE INTERNET, THIS WEB SITE, ITS CONTENT OR ITS LINKS
    Further, the Company will not be liable to you for any failure or delay by the Company to provide access to the Data or any of its obligations under these terms and conditions where such failure or delay is the direct or indirect result of any circumstances beyond the Company's reasonable control (and the Company's obligations will be suspended for the duration of such circumstances).

    CAD Download (Unit Assembly)

    CAD Download: File Format
    生成

    Thank you for downloading the data.

    Click the Good IDEA! button when you find interesting design tips.


    This data is utilized in order to list more useful application examples in the future.

    CAD Data Limitations

    1. Assembly data shows the assembly drawings in the concept design phase. The sole purpose of the data is to explain the structure and functionality of the assembly and is not considered nor to be used as a final design.
      You will need to edit the Data so that it meets your specific design conditions.
    2. Unit assembly Data consists of some sub-assemblies.
      It is configured so that each sub-assembly unit can be used as it is or edited.
    3. * The part in the frame is a sub-assembly unit.

    4. The Data for fabricated parts is based on easy-to-edit dimensions and shapes in sketches and histories.
    5. The Data including the third-part components are made by the Company.

    Page top

Page top