(!)Due to Microsoft's end of support for Internet Explorer 11 on 15/06/2022, this site does not support the recommended environment.

ideanote
inCAD Library

Please read before use

What is inCAD Library?

  • Helpful application examples for mechanical engineers.

The Concept of inCAD Library

  • Online application library with a range of ideas for all manufacturing industries.
  • Save design time and learn new design applications when you are concepting new machines.

Disclaimer

  • MISUMI may not offer all parts in each application design. Available parts can only be purchased separately not as a unit shown in each application design.
  • MISUMI does not guarantee quality, accuracy, functionality, safety or reliability for the combination of the parts in each application example. Accept these points prior to use.
  • 2014 Copyright MISUMI
  • The data cannot be used for any purposes (including sales promotion) except for designing your machine.
  • All associated CAD is free. Misumi reserves the right at its sole discretion to cancel, terminate or modify this offer.
  • MISUMI may change, add or delete application examples posted without prior notice.
  • MISUMI assumes no responsibilities for any damage incurred resulting from your use of the Service or any change, addition or deletion by MISUMI of the application examples for any reason whatsoever.

inCAD Library Features

  1. Get great new design ideas for these application examples.
  2. Over 300 design application ideas
    collected from dozens of industries!

  3. Find application examples quickly! Search by function, workpiece shape, etc.

  4. Download the CAD models for each application example.
  5. Log in to download free CAD models.
    Download CAD for the entire application example!

Good IDEA! button

Click the Good IDEA! Button when you like an application example!

*Can only be clicked once per application example.

  • Upper right corner on the page of application example details

  • Pop-up dialog for CAD data downloading

Page top

Keyword Search
No. Search

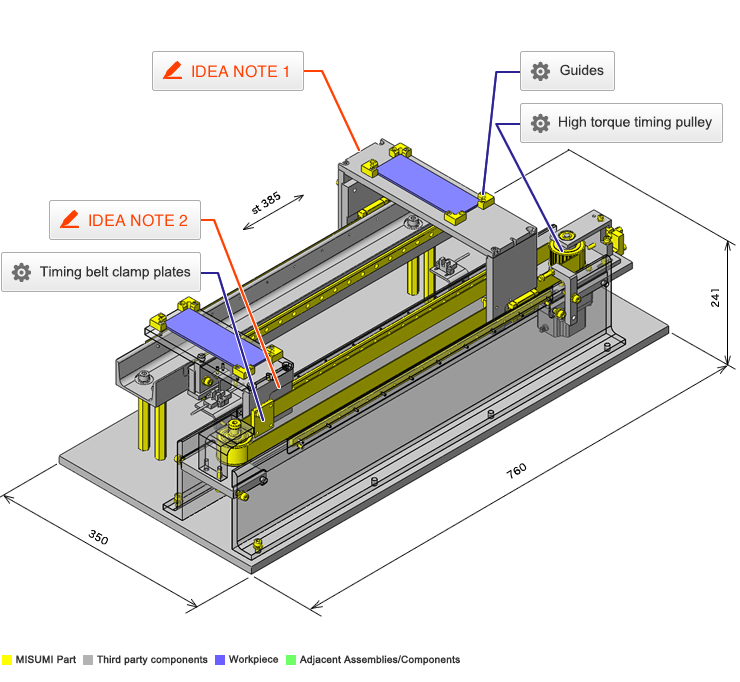
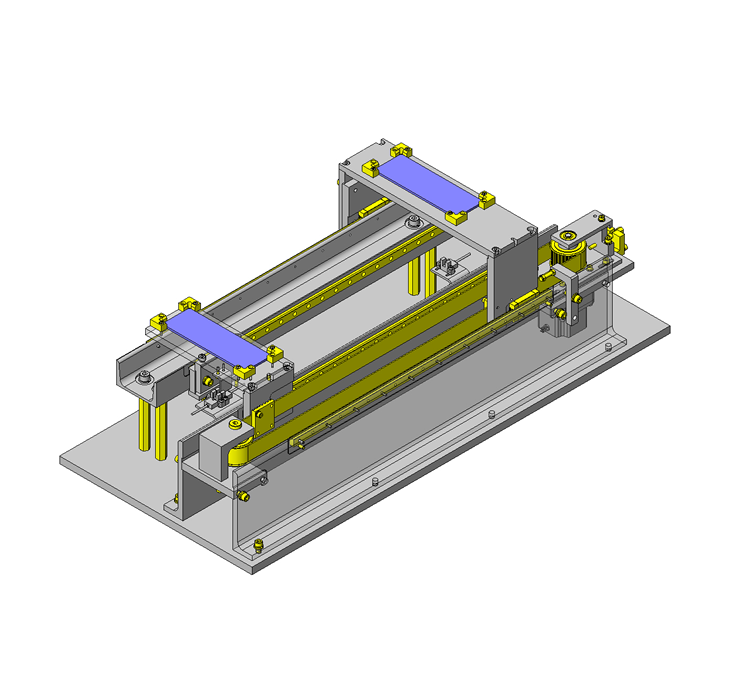
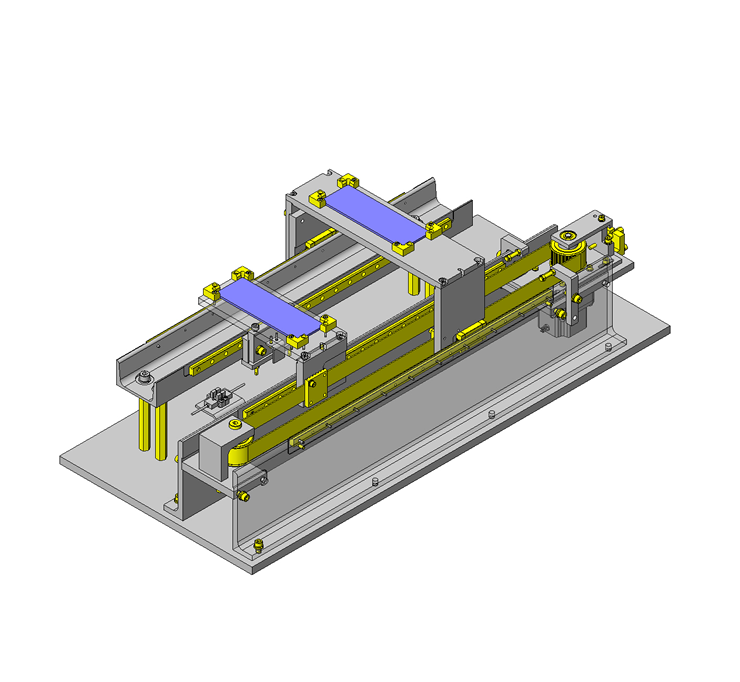
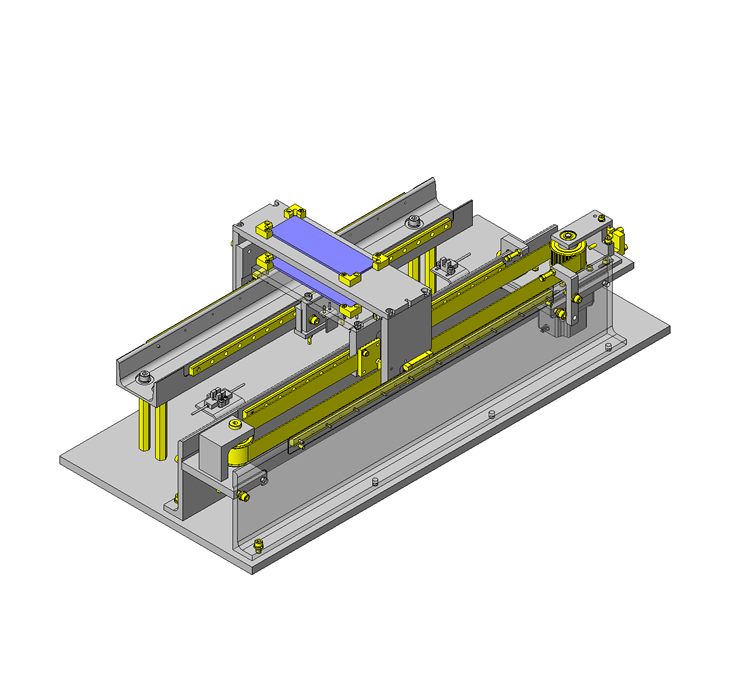
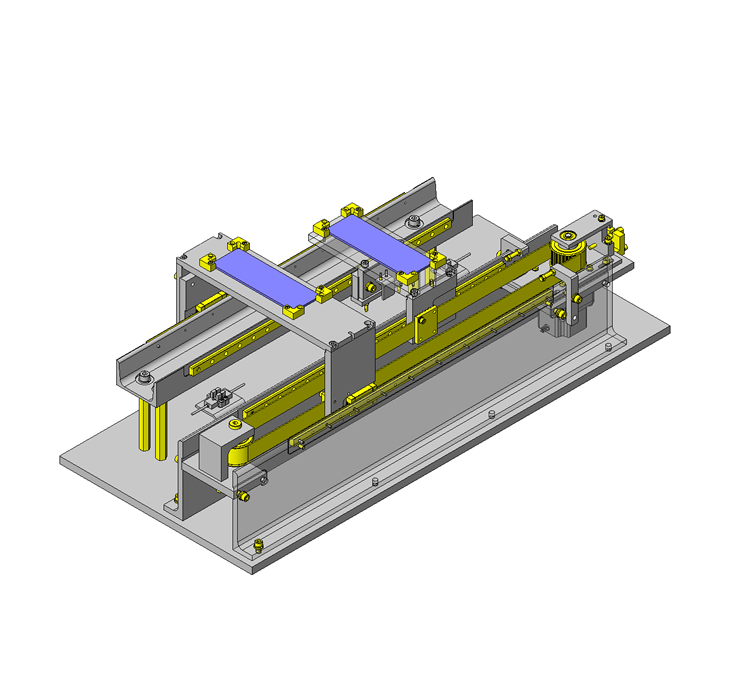
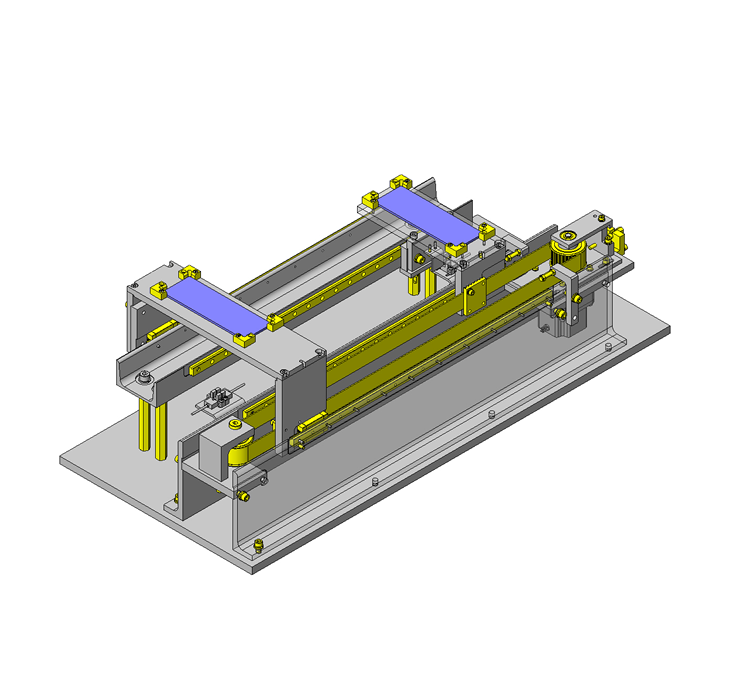
No.000140 Shuttle Transfer Mechanism

Two workpieces are transferred simultaneously through a belt mechanism.

Relevant category

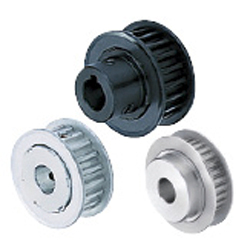
High torque timing pulley

Product name High Torque Timing Pulleys S5M Type
Part number HTPA28S5M250-A-P8-QTC18-M3
Features New! METRIC/ INCH Bores Available!
* Orange colored cells in the table below indicate the part numbers used in this example.

Selection criteria

Aluminum alloy, which is light and commonly used for timing belt driving pulley, was selected.

Back to page top

Available sizes

■Timing Pulleys (S5M type)

Material Surface Treatment Accessory
Set Screw
Pulley Flanged
2017 Aluminum Alloy
(Duralumin)
5052 Aluminum Alloy Clear Anodize 304 Stainless Steel
Black Anodize
Hard Clear Anodize
Electroless Nickel Plating
1045 Carbon Steel Low Carbon Steel 4137 Alloy Steel
(Black Oxide)
Black Oxide
Electroless Nickel Plating
304 Stainless Steel 304 Stainless Steel

■Sizes and Dimensions

Number of Teeth Nominal Width Pulley Shape Shaft Bore Specs.  Shaft Bore Specs. (1mm Increments)
Straight Bore Straight Bore+Tap New JIS Keywayed
Bore+Tap,
Old JIS Keywayed Bore
+Tap
Stepped Hole・Stepped Holes (Counterbore Holes on the Hub Side) Both Ends Stepped Bore
Hole Dia. Hole Dia. Counterbore Hole Dia. Counterbore, Depth Hole Dia. Counterbore
Hole Dia.
Counterbore,
Depth
No Hub With Hub No Hub With Hub No Hub With Hub No Hub With Hub No Hub With Hub With hub, without hub No Hub No Hub No Hub
14 100


150


250
No Hub


With Hub
Straight Bore

Straight Bore
+Tap

New JIS Keywayed Bore
+ Tap,

Old JIS Keywayed Bore
+ Tap

Stepped Hole

Stepped Hole
(Counterbore Holes
on the Hub Side)

Both Ends Stepped Bore
5-10 5-10 5-10 5-8 8・10 - 5・6 5・6 7・8 7・8 (When No Hub)
2.0 ≤ Counterbore depth
≤ Ridge width - 2.0


(When with hub)
2.0 ≤ Counterbore depth
≤ Full length - 2.0
5・6 7・8 3-14
Total of
counterbore depth
≤ Width - 3
15 5-10 5-10 5-10 5-8 8・10 5-8 5-8 7-10 7-10 5-8 7-10
16 5-12 5-12 5-12 5-10 8-12 8 5-10 5-10 7-12 7-12 5-10 7-12
18 6-14 6-14 6-12 6-11 8-12 8・10 6-12 6-12 8-14 8-14 6-12 8-14
19 6-16 6-15 6-16 6-11 8-16 8・10 6-14 6-13 8-16 8-15 6-14 8-16
20 6-16 6-15 6-16 6-11 8-16 8・10 6-14 6-13 8-16 8-15 6-14 8-16
22 7-19 7-19 7-18 7-15 8-18 8-12 7-17 7-17 9-19 9-19 7-17 9-19
24 7-22 7-22 7-20 7-17 8-20 8-13 7-20 7-20 9-23 9-23 7-20 9-22
25 7-22 7-22 7-20 7-17 8-20 8-15 7-20 7-20 9-23 9-23 7-20 9-22
26 8-27 8-27 8-22 8-21 8-22 8-17 8-25 8-25 10-27 10-27 8-25 10-27
28 8-27 8-27 8-24 8-22 8-24 8-18 8-25 8-25 10-27 10-27 8-25 10-27
30 10-28 10-28 10-26 10-23 10-26 10-18 10-26 10-26 12-28 12-28 10-26 12-28
32 10-32 10-32 10-28 10-27 10-28 10-22 10-30 10-30 12-32 12-32 10-30 12-32
34 10-37 10-36 10-30 10-30 10-30 10-25 10-35 10-34 12-37 12-36 10-35 12-37
36 10-37 10-36 10-30 10-30 10-30 10-25 10-35 10-34 12-37 12-36 10-35 12-37
40 10-42 10-42 10-38 10-35 10-38 10-28 10-40 10-40 12-42 12-42 10-40 12-42
44 12-50 12-46 12-42 12-38 12-40 12-32 12-48 12-44 14-50 14-46 12-48 14-50
48 12-55 12-55 12-45 12-45 12-40 12-40 12-53 12-53 14-55 14-55 12-53 14-55
50 12-59 12-59 12-45 12-45 12-43 12-43 12-57 12-57 14-59 14-59 12-57 14-59
60 12-72 12-71 12-45 12-45 12-45 12-45 12-70 12-69 14-72 14-71 12-70 14-72
72 12-80 12-80 12-65 12-65 12-50 12-50 12-80 12-80 14-92 14-86 12-75 14-92

Back to page top

Selection steps

■Timing belt selection procedure

* Timing belt selection is made at the same time as selecting timing pulleys.

Automated selection tool is available.

http://fawos.misumi.jp/FA_WEB/pulley_us/

Determine Operating Conditions
Designed power, rotational speed, rotation ratio, interim shaft distance, motion pattern, etc.

Belt temporary selection
Belt type·Belt width

Verification of specifications applicability
  • Confirmation of calculated shaft distance, etc.
  • Confirmation of belt tension and load

Back to page top

Technical calculations

■Timing pulley technical calculations

Timing pulley, belt selection automatic calculation tool

Back to page top

Timing belt clamp plates

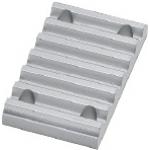
Product name Timing Belt Clamp Plate - Nut Fitting Type, Single
Part number TBCR-S5M250
* Orange colored cells in the table below indicate the part numbers used in this example.

Selection criteria

Cost Efficient

Back to page top

Available sizes

■Timing Belt Clamp Plate (Bottom plate Short type S5M)

Material Surface Treatment
A6N01-T5 Clear Anodize

■Sizes and Dimensions

Belt Type Belt Nominal Width Vertical(mm) Horizontal (mm) Thickness(mm)
XL 025 36 24 6
031 25
037 26
050 30
L 050 66 32 8
075 38
100 46
150 58
H 075 89 38 10
100 46
150 58
200 70
S3M 060 21 20 4
100 25
150 30
S5M 100 35 26 6
150 32
250 42
S8M 150 56 34 8
250 44
300 50
400 60
TS 100 35 26 6
150 32
200 38
250 43
T10 150 70 34 8
200 40
250 44
300 50

Back to page top

Guides

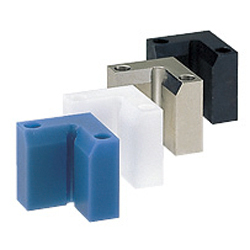
Product name Guides- L-Shaped
Part number WGLBC-20-10-10
* Orange colored cells in the table below indicate the part numbers used in this example.

Selection criteria

Easy to obtain

Back to page top

Available sizes

■Workpiece guide (L shaped compact type)

Material Hardness Surface Treatment
1045 Carbon Steel Black Oxide
Electroless Nickel Plating
40HRC- Black Oxide
Electroless Nickel Plating
2017 Aluminum Alloy
304 Stainless Steel
Polyacetal
MC Nylon
Electrically conductive MC Nylon R2
PTFE

■Sizes and Dimensions

On a side
(mm)
Height
(mm)
Installation Hole Dia.
(mm)
17、20 6-10 3.5
20、30 3.5

Back to page top

Accuracy Info.

■Accuracy information of workpiece guide

Perpendicularity: 0.05

Back to page top

IDEA NOTE Tables in two tiers halve takt time.

This structure allows multiple workpieces to be transferred at the same time as two tables are operated simultaneously by a single motor and a single belt.

IDEA NOTE Measures against belt damage in early stage

The belt is likely to be damaged early in production as the portions of the belt to which parts are fixed rattle when the driving force is applied to the belt. To counter this, a clearance space is provided for each part to prevent interference.

  • TERMS AND CONDITIONS FOR USE OF CAD DATA
    Your access to the CAD data that MISUMI Corporation (hereinafter referred to as the Company) posts on this site (including 3D CAD data, intermediate 3D CAD data and 2D CAD data; hereinafter referred to as the Data) are of products manufactured and/or sold by the Company (hereinafter referred to as the Products) assumes that you have read and accepted these terms and conditions which govern your use of the Data. If you do not agree to these terms and conditions, you must stop using this website and the Data. You must not use the Data for any unlawful purpose or in any manner inconsistent with these terms and conditions.
    1. CAD Data
    The Data is prepared for assisting the Company's users in the CAD design process by providing dimensions and other Product information. In order to provide the best speed and stability working within this site, the Product drawings were simplified to reduce the size of the Data. For instance, some of the Products are shown without the oil groove shape, screws or spring shape. Also, please be aware that the tolerance, surface roughness and/or chamfer of the Data may vary from the actual Products.
    2. Disclaimer on Data
    While the Company has carefully prepared the Data, accuracy of the Data is not guaranteed and is subject to the variances as described above. The Company may also modify, add or delete the Data at any time without prior notice. The Company assumes no liability for any direct, indirect, consequential or special damages that you may claim resulted from your use of the Data or any changes to or deletions of the Data regardless of the reason. The Company provides no warranty as to the quality, accuracy, functionality, safety or reliability of the combination of Products and parts. Example applications and combinations of the Products are provided for illustrative purposes only.
    3. Copyright
    Copyrights to the content and the Data belong to the Company or the manufacturers of the Products. The said copyright is protected by the Copyright Act and international treaties. The use (including duplication, modification, uploading, posting, transmission, distribution, licensing, sales and publishing) of the Data except for the purpose to use the Data described above without prior approval of the Company is not allowed. The Data cannot be used for any purposes (including sales promotion) except for designing your machine. If you violate this provision or the laws or regulations, the Company may prohibit you from the use of the Data, the Company’s site and/or take legal action. So long as you comply with these terms and conditions, the Company grants to you a non-exclusive, non-transferable, revocable license to access and use the Data for the sole purpose of assisting you in designing machines that incorporate products.
    In case that the CAD data is found to have been to be used for any purpose other than mentioned above or against the related laws, MISUMI may take legal actions, including the one for blocking the involved user from using CAD data and from accessing to the MISUMI site.
    4. Disclaimer of Warranty
    ANY AND ALL CONTENT APPEARING ON THIS WEB SITE IS PROVIDED FOR INFORMATIONAL PURPOSES ONLY. THIS WEB SITE, ITS CONTENT AND ITS LINKS ARE PROVIDED ON AN "AS IS" AND "AS AVAILABLE" BASIS AND ARE USED ONLY AT YOUR SOLE RISK, TO THE FULLEST EXTENT PERMISSIBLE BY LAW. THE COMPANY DISCLAIMS ALL WARRANTIES, EXPRESS OR IMPLIED, OF ANY KIND, REGARDING THIS WEB SITE (INCLUDING ITS CONTENT, HARDWARE, SOFTWARE AND LINKS), INCLUDING AS TO FITNESS FOR A PARTICULAR PURPOSE, MERCHANTABILITY, TITLE, NON INFRINGEMENT, RESULTS, ACCURACY, COMPLETENESS, ACCESSIBILITY, COMPATIBILITY, SECURITY AND FREEDOM FROM COMPUTER VIRUS. THE COMPANY WILL NOT BE LIABLE FOR ANY DAMAGES OR LOSSES, INCLUDING DIRECT, INDIRECT, CONSEQUENTIAL, SPECIAL, INCIDENTAL OR PUNITIVE DAMAGES AND/OR LOST PROFITS, IN CONNECTION WITH USE OF THE INTERNET, THIS WEB SITE, ITS CONTENT OR ITS LINKS
    Further, the Company will not be liable to you for any failure or delay by the Company to provide access to the Data or any of its obligations under these terms and conditions where such failure or delay is the direct or indirect result of any circumstances beyond the Company's reasonable control (and the Company's obligations will be suspended for the duration of such circumstances).

    CAD Download (Unit Assembly)

    CAD Download: File Format
    生成

    Thank you for downloading the data.

    Click the Good IDEA! button when you find interesting design tips.


    This data is utilized in order to list more useful application examples in the future.

    CAD Data Limitations

    1. Assembly data shows the assembly drawings in the concept design phase. The sole purpose of the data is to explain the structure and functionality of the assembly and is not considered nor to be used as a final design.
      You will need to edit the Data so that it meets your specific design conditions.
    2. Unit assembly Data consists of some sub-assemblies.
      It is configured so that each sub-assembly unit can be used as it is or edited.
    3. * The part in the frame is a sub-assembly unit.

    4. The Data for fabricated parts is based on easy-to-edit dimensions and shapes in sketches and histories.
    5. The Data including the third-part components are made by the Company.

    Page top

  • * Unit assembly Data consists of some sub-assemblies.
       It is configured so that each sub-assembly unit can be used as it is or edited.

Application Overview

Purpose

  • A single driving mechanism to simultaneously transfer two workpieces in opposite directions.

Points for use

  • Automatic mechanism in which a single driving mechanism drives two tables.

Target workpiece

  • Workpiece: printed circuit board
  • Outer dimensions:W150 x D50 x H3 mm
  • Workpiece weight:50g

Design Specifications

Operating Conditions or Design Requirements

  • Table Stroke: 385mm
  • Outer dimensions: W760 x D350 x H241 mm

Required Performance

  • Required accuracy:±0.5mm

Selection Basis for Main Components

  • Stepping motor
    • Easy positioning.

Design Evaluation

Verification of main components

  • The allowable motor torque is verified to see whether the torque requirement (= load torque + acceleration torque) is satisfied.
  • Stepping motor
    • Conditional value = allowable motor torque T = 2.7 Nm, transfer mass M = 2.6 kg, acceleration a = 0.385m/s&sup2, operation speed NM = 180 [r/min], linear guide friction coefficient μ = 0.1 (take a larger value), acceleration time s = 0.5 s, pulley diameter D = 0.04456 m, pulley reduction ratio i1 = 1, pulley weight m = 0.33 kg, rotor inertia moment = Jo = 120 × 10⁻⁷ [kg•m²], motor reduction ratio i2 = 10, efficiency η = 0.85
    • Load in operation direction = F [N ] = Ma = M × (a + μg ) = 2.6 × (0.385 + 0.98) = 3.55
    • Load torque TL [N•m] = (F × D)/(2 × η × i1) = (3.55 × 0.04456)/(2 × 0.85 × 1) = 0.093
    • Loading moment of inertia JL [kg•m&sup2] = M × (π × D/2 × π)&sup2 + (m × D²)/8 = 2.6 × (0.04456/2)&sup2 + (0.33 × 0.04456&sup2)/8 = 0.0014
    • Acceleration torque Ta [Nm] = ((Jo × i2&sup2 + JL)/9.55)) × (NM/s) = ((120 × 10 - 7 × 10&sup2 + 0.0014)/9.55) × (180/0.5 ) = 0.098 (9.55 is constant)
    • Required torque TM [N・m] = from TL + Ta = 0.093 + 0.098 ≈ 0.19 < 2.7 = T
      -> There is no problem.

Other Design Consideration

  • When the motor is rotated, two belt movement directions can be obtained, and the belt is connected to two tables that can be moved in different directions.
  • As the belt design tension of 206N cannot support the allowable overhang load of 50N, bearings are added. The mechanism is assembled using the following steps to protect the motor.
    (1) Temporarily tighten the bolts that fix the motor.
    (2) Strain the belt.
    (3) Finally tighten the bolts to fix the motor.
  • Positioning accuracy may be low at the end of the travel.
  • Table plates are welded for strength and reinforcement.
  • As a measure against failure, one microphotosensor is used for home positioning, and another microphotosensor is used for overrun prevention.
  • As the upper and lower tables pass each other, there is a risk of injury.
    Therefore, the unit should have a cover for the entire mechanism to reduce the operator injury risk.

Explore Similar Application Examples

Page - / -

Part List

No. Part Name Sample Picture MISUMI Part Number
(click the Part Number below for details)
Quantity
1 High Torque Timing Pulleys HTPA28S5M250-A-P8-QTC18-M3 1
2 Flanged Idler AHTFW28-S5M250-10 1
3 Timing Belts HTBN1350S5M-250 1
4 Timing Belt Clamp Plate TBCR-S5M250 2
5 Deep Groove Ball Bearings FL608ZZ 1
6 Hinge Pins CLBRU10-66.0 1
7 Bearing Spacer CLBU10-17-5 1
8 Bearing Spacer CLBU10-17-7 1
9 Adjusting Blocks AJSLCM5-25 1
10 Hex Posts LSBWF13-100 4
11 Linear Guides SSELB13-470 4
12 Stopper Bolts With Bumpers UST5-25 2
13 Adjusting Bolts AJSTM5-35 1
14 Dowel Pins MSC4-12 6
15 Workpiece Guide WGLBC-20-10-10 8
16 Screw Stopper ANS4-25 4
17 Low Head Cap Screws CBSST4-12 2
18 Socket Head Cap Screws-with Washer CBST3-8 2
19 Socket Head Cap Screws-with Washer CBST4-12 10
20 Socket Head Cap Screws-with Washer CBST4-15 2
21 Socket Head Cap Screws-with Washer CBST4-20 8
22 Socket Head Cap Screws-with Washer CBST5-15 4
23 Socket Head Cap Screws-with Washer CBST5-25 4
24 Socket Head Cap Screws-with Washer CBST6-20 27
25 Socket Head Cap Screws-with Washer CBST6-25 2
  • The part list above only contains MISUMI parts.
    Part list download (CSV) includes MISUMI and third party components used in this example.
  • TERMS AND CONDITIONS FOR USE OF CAD DATA
    Your access to the CAD data that MISUMI Corporation (hereinafter referred to as the Company) posts on this site (including 3D CAD data, intermediate 3D CAD data and 2D CAD data; hereinafter referred to as the Data) are of products manufactured and/or sold by the Company (hereinafter referred to as the Products) assumes that you have read and accepted these terms and conditions which govern your use of the Data. If you do not agree to these terms and conditions, you must stop using this website and the Data. You must not use the Data for any unlawful purpose or in any manner inconsistent with these terms and conditions.
    1. CAD Data
    The Data is prepared for assisting the Company's users in the CAD design process by providing dimensions and other Product information. In order to provide the best speed and stability working within this site, the Product drawings were simplified to reduce the size of the Data. For instance, some of the Products are shown without the oil groove shape, screws or spring shape. Also, please be aware that the tolerance, surface roughness and/or chamfer of the Data may vary from the actual Products.
    2. Disclaimer on Data
    While the Company has carefully prepared the Data, accuracy of the Data is not guaranteed and is subject to the variances as described above. The Company may also modify, add or delete the Data at any time without prior notice. The Company assumes no liability for any direct, indirect, consequential or special damages that you may claim resulted from your use of the Data or any changes to or deletions of the Data regardless of the reason. The Company provides no warranty as to the quality, accuracy, functionality, safety or reliability of the combination of Products and parts. Example applications and combinations of the Products are provided for illustrative purposes only.
    3. Copyright
    Copyrights to the content and the Data belong to the Company or the manufacturers of the Products. The said copyright is protected by the Copyright Act and international treaties. The use (including duplication, modification, uploading, posting, transmission, distribution, licensing, sales and publishing) of the Data except for the purpose to use the Data described above without prior approval of the Company is not allowed. The Data cannot be used for any purposes (including sales promotion) except for designing your machine. If you violate this provision or the laws or regulations, the Company may prohibit you from the use of the Data, the Company’s site and/or take legal action. So long as you comply with these terms and conditions, the Company grants to you a non-exclusive, non-transferable, revocable license to access and use the Data for the sole purpose of assisting you in designing machines that incorporate products.
    In case that the CAD data is found to have been to be used for any purpose other than mentioned above or against the related laws, MISUMI may take legal actions, including the one for blocking the involved user from using CAD data and from accessing to the MISUMI site.
    4. Disclaimer of Warranty
    ANY AND ALL CONTENT APPEARING ON THIS WEB SITE IS PROVIDED FOR INFORMATIONAL PURPOSES ONLY. THIS WEB SITE, ITS CONTENT AND ITS LINKS ARE PROVIDED ON AN "AS IS" AND "AS AVAILABLE" BASIS AND ARE USED ONLY AT YOUR SOLE RISK, TO THE FULLEST EXTENT PERMISSIBLE BY LAW. THE COMPANY DISCLAIMS ALL WARRANTIES, EXPRESS OR IMPLIED, OF ANY KIND, REGARDING THIS WEB SITE (INCLUDING ITS CONTENT, HARDWARE, SOFTWARE AND LINKS), INCLUDING AS TO FITNESS FOR A PARTICULAR PURPOSE, MERCHANTABILITY, TITLE, NON INFRINGEMENT, RESULTS, ACCURACY, COMPLETENESS, ACCESSIBILITY, COMPATIBILITY, SECURITY AND FREEDOM FROM COMPUTER VIRUS. THE COMPANY WILL NOT BE LIABLE FOR ANY DAMAGES OR LOSSES, INCLUDING DIRECT, INDIRECT, CONSEQUENTIAL, SPECIAL, INCIDENTAL OR PUNITIVE DAMAGES AND/OR LOST PROFITS, IN CONNECTION WITH USE OF THE INTERNET, THIS WEB SITE, ITS CONTENT OR ITS LINKS
    Further, the Company will not be liable to you for any failure or delay by the Company to provide access to the Data or any of its obligations under these terms and conditions where such failure or delay is the direct or indirect result of any circumstances beyond the Company's reasonable control (and the Company's obligations will be suspended for the duration of such circumstances).

    CAD Download (Unit Assembly)

    CAD Download: File Format
    生成

    Thank you for downloading the data.

    Click the Good IDEA! button when you find interesting design tips.


    This data is utilized in order to list more useful application examples in the future.

    CAD Data Limitations

    1. Assembly data shows the assembly drawings in the concept design phase. The sole purpose of the data is to explain the structure and functionality of the assembly and is not considered nor to be used as a final design.
      You will need to edit the Data so that it meets your specific design conditions.
    2. Unit assembly Data consists of some sub-assemblies.
      It is configured so that each sub-assembly unit can be used as it is or edited.
    3. * The part in the frame is a sub-assembly unit.

    4. The Data for fabricated parts is based on easy-to-edit dimensions and shapes in sketches and histories.
    5. The Data including the third-part components are made by the Company.

    Page top

Page top