(!)Due to Microsoft's end of support for Internet Explorer 11 on 15/06/2022, this site does not support the recommended environment.

ideanote
inCAD Library

Please read before use

What is inCAD Library?

  • Helpful application examples for mechanical engineers.

The Concept of inCAD Library

  • Online application library with a range of ideas for all manufacturing industries.
  • Save design time and learn new design applications when you are concepting new machines.

Disclaimer

  • MISUMI may not offer all parts in each application design. Available parts can only be purchased separately not as a unit shown in each application design.
  • MISUMI does not guarantee quality, accuracy, functionality, safety or reliability for the combination of the parts in each application example. Accept these points prior to use.
  • 2014 Copyright MISUMI
  • The data cannot be used for any purposes (including sales promotion) except for designing your machine.
  • All associated CAD is free. Misumi reserves the right at its sole discretion to cancel, terminate or modify this offer.
  • MISUMI may change, add or delete application examples posted without prior notice.
  • MISUMI assumes no responsibilities for any damage incurred resulting from your use of the Service or any change, addition or deletion by MISUMI of the application examples for any reason whatsoever.

inCAD Library Features

  1. Get great new design ideas for these application examples.
  2. Over 300 design application ideas
    collected from dozens of industries!

  3. Find application examples quickly! Search by function, workpiece shape, etc.

  4. Download the CAD models for each application example.
  5. Log in to download free CAD models.
    Download CAD for the entire application example!

Good IDEA! button

Click the Good IDEA! Button when you like an application example!

*Can only be clicked once per application example.

  • Upper right corner on the page of application example details

  • Pop-up dialog for CAD data downloading

Page top

Keyword Search
No. Search

No.000152 Lifter Mechanism

Lifting mechanism guided by interlocking gears

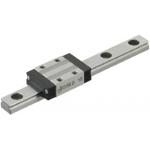
Miniature Linear Guides

Product name Miniature Linear Guides Standard Blocks, Light Preload, Precision Class L Configurable Type
Part number SEB10-55
Features The most basic type among all the industry standard-compliant blocks.
* Orange colored cells in the table below indicate the part numbers used in this example.

Selection criteria

Effective when linear motions are needed in limited space

Back to page top

Available sizes

■Miniature Linear Guides (standard blocks, light preloading, slight clearance)

Material Hardness
Stainless steel 56HRC~
Carbon steel
Carbon Steel (Alloy Steel including SCM)
58HRC~

■Sizes and Dimensions

Number of Blocks Block Width Block Length Overall Height Rail Length
1 12 17.4 6 25-100
17 23.6 8 40-130
20 30 10 35-275
27 33.9 13 45-470
32 42.4 16 70-670
40 50 20 100-700
2 12 17.4 x 2pcs. 6 70-100
17 23.6 x 2pcs. 8 70-130
20 30 x 2pcs. 10 75-275
27 33.9 x 2pcs. 13 95-470
32 42.4 x 2pcs. 16 110-670
40 50 x 2pcs. 20 160-700

Back to page top

Selection Steps

Determination on Operating Conditions
(Moving mass, feed rate, motion pattern, life)

Temporary selection of linear guide specifications
(Number of blocks, block type, height and rail length are temporarily selected based on the usage conditions.)

Basic safety check
  • Allowable Load
  • Operating Life
  • Preload

Back to page top

Accuracy Info

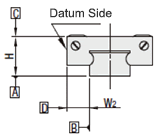
■Preload and Accuracy Standards (standard blocks, light preload, slight clearance)

(μm)

Specification Light Preload,
High Grade
Light Preload,
Precision Grade
Slight Clearance,
Standard Grade
Radial Clearance -3-0 0~+15
H Dimension Tolerance ±20 ±10 ±20
Pair variation of H 15 7 40
Tolerance of dims. W2 ±25 ±15 ±25
Pair variation of W2 20 10 40

■Running Parallelism

(μm)

Rail length(mm)
-80 81-200 201-250 251-315 316-400 401-500 501-630 631-700
Precision Grade 2 3 3.5 4 5 5 6 6
High Grade 3 7 9 11 11 12 13.5 14
Standard Grade 13 15 17 18 18 19 21 21.5

* The slight clearance type has clearances (play) between the rail and blocks.

Back to page top

Performance info.

Rated Load of Linear Guide (wide standard blocks, slight clearance)

Overall Height Basic Load Rating Allowable Static Moment
C (Dynamic) kN Co (Static) kN MA
N・m
MB
N・m
Mc
N・m
6 0.3 0.6 0.8 0.8 1.5
8 0.9 1.5 4.1 4.1 5.2
10 1.5 2.5 5.1 4.1 10.2
13 2.2 3.3 8.8 9.5 16.1
16 3.6 5.4 21.6 23.4 39.6
20 5.2 8.5 48.4 48.4 86.4

Back to page top

Technical Calculations

Operating Life Calculation for Linear Guides

Life
When the linear guide is loaded in linear reciprocating motion, scaly damages called flaking appear due to material fatigue as the stress works on the rolling elements (steel balls) and the rolling contact surfaces (rails) constantly. Total travel distance until the first flaking occurs is called the life of linear guides.
Rated Life
Rated life is the total travel distance that 90% of linear guides of the same type can reach, under the same conditions, with no occurrence of flaking damage. Rated life can be calculated with the basic dynamic load rating and the actual load applied on the linear guides, as shown below.
Load must be calculated before actually using linear guides. To obtain loads during linear reciprocating motion, it is necessary to fully consider vibrations and impacts during motion as well as distribution condition of the load applied to linear guides. So, it is not easy to calculation the loads. Operating temperature also critically affects the life. Considering these conditions, the above-mentioned calculation formula will be as follows.
  • L: Rated Life (Km)
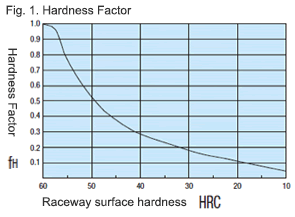
  • fH: Hardness Factor (See Fig.1)
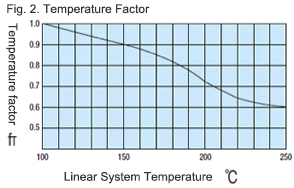
  • fT: Temperature Factor (See Fig.2)
  • fC: Contact Factor (See Table-1)
  • fW: Load Factor (See Table-2)
  • C: Basic Dynamic Load Rating (N)
  • P: Applied Load (N)
Hardness factor (fH)

For liner guide applications, sufficient hardness is required for ball contact shafts. Inappropriate hardness causes less allowable load, resulting in shorter life.
Please correct the rated life with the hardness factor.

Temperature Factor (fT)

When the temperature of linear guides exceeds 100°C, the hardness of guides and shafts will be reduced, and the allowable loads will also be reduced compared to being used at room temperature, causing a reduction of life. Please correct the rated life with the temperature factor.
* Please use Linear Guides at within the heat resistance temperature ranges shown on product pages.

Contact Factor (fC)

Table-1. Contact Factor

Number of Blocks per Rail Contact Factor fC

1 1.00
2 0.81
3 0.72
4 0.66
5 0.61

For actual applications, more than two blocks are generally used per shaft. In this case, the load applied to each block varies depending on machining precision and is not uniformly distributed. As a result, per-block allowable load varies depending on the number of blocks per rail. Please compensate the rated life with contact factors on Table-1.

Load Factor (fW)

Table-2. Load factor

Condition of Use fw
No shocks / vibrations, low speed:
15 m/min. or less
1.0-1.5
No significant shocks / vibrations,
medium speed: 60 m/min. or less
1.5-20
With shocks / vibrations, high
speed: 60 m/min. or more
2.0-3.5

To calculate load applied to the Linear Guides, in addition to object weight, it requires inertia force attributed to motion velocity or moment loads. However, it is difficult to calculate the load accurately due to potential vibrations and shocks caused by other element than repeated start-stop motions during reciprocating motion. Thus, Table-2 load factor helps simplify the life calculation.

Applied Load P Calculation Method
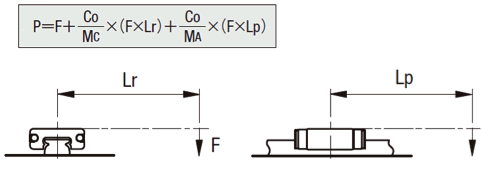
When moment load is applied to each block, convert the moment load into applied load by the following formula.
  • P: Applied Load (N)
  • F: Downward load (N)
  • C0: Static load rating (N)
  • MA: Allowable Static Moment - Pitching Direction (N·m)
  • MC: Allowable Static Moment - Rolling Direction (N·m)
  • Lp: Load Point Distance (m) in Pitching Direction
  • Lr: Load Point Distance (m) in Rolling Direction

Back to page top

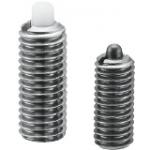
Spring Plungers

Product name Spring Plungers - Stainless Steel
Part number PJXW4-4
* Orange colored cells in the table below indicate the part numbers used in this example.

Selection criteria

Effective as space saving and low price components for positioning reaction force

Back to page top

Available sizes

■Spring Plungers - Stainless Steel

Nose
Material
Load Type Body Pin Spring Operating Temperature
Material Material Hardness Material
Stainless Steel Ultra Light Load 304 Stainless Steel 440C Stainless Steel 55HRC〜 631 Stainless Steel -30〜260℃
Light Load
Heavy Load
Extra Heavy Load
Plastic Ultra Light Load Polyacetal -30〜80℃
Light Load
Heavy Load
Extra Heavy Load

■Sizes and Dimensions

Screw Dia.
(Coarse)
Nose Body length
Diameter Stroke
M3 φ1 1.5 15
3 15
M4 φ1.6 2 15
4 24
M5 φ2 3 20
5 27
M6 φ2.5 3 25
5 30
M8 φ3.1 3 25
5 27
M10 φ3.8 5 30
10 43
M12 φ5.5 5 30
10 43
15 51
M16 φ8 10 57
15 57
20 65

Back to page top

Performance info.

■Spring Load (N) of Spring Plunger (Stainless Steel)

Load type
Screw Dia.
(Coarse)
Nose Ultra Light Load Light Load Heavy Load Extra Heavy Load
Diameter Stroke min. max. min. max. min. max. min. max.
M3 φ1 1.5 0.1 0.4 0.4 1.3 0.8 2.9 1.1 3.4
3 0.1 0.4 0.2 1.3 0.6 2.9 0.8 3.4
M4 φ1.6 2 0.3 0.7 0.9 2.0 2.0 8.8 6.1 13.8
4 0.2 0.7 0.6 2.1 1.9 8.8 5.8 13.6
M5 φ2 3 0.4 3.0 1.4 9.7 2.7 16.3 6.8 22.0
5 0.4 3.0 1.1 10.3 1.0 17.1 5.7 21.5
M6 φ2.5 3 1.8 3.1 6.0 9.8 8.0 26.4 15.8 35.6
5 1.5 3.1 3.4 9.86 4.4 26.6 12.9 34.4
M8 φ3.1 3 1.9 3.2 6.0 9.9 14.7 27.0 21.9 36.3
5 1.4 3.2 4.0 9.83 6.7 26.6 14.7 34.5
M10 φ3.8 5 1.6 4.6 5.7 14.7 8.2 45.7 24.5 58.6
10 1.6 4.6 4.4 14.7 6.2 45.1 19.8 58.7
M12 φ5.5 5 1.7 4.7 5.8 14.7 18.2 49.0 34.9 63.6
10 1.6 4.7 5.0 14.7 8.2 49.1 25.5 63.6
15 1.8 4.7 6.9 14.7 7.5 48.9 20.1 63.7
M16 φ8 10 2.8 10.8 9.2 34.2 18.9 68.5 38.7 88.4
15 2.6 10.8 8.6 34.4 14.4 68.6 33.9 88.1
20 2.0 11.0 7.1 34.4 4.2 68.6 25.4 88.1

* Min. is the initial load, and max. is the load when the nose is fully compressed.

Back to page top

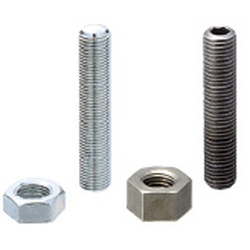
Adjusting Stopper Screws

Product name Adjusting Stopper Screws- Hexagon Socket, L Configurable, Fine Thread
Part number ANBNS4-25
* Orange colored cells in the table below indicate the part numbers used in this example.

Selection criteria

Effective in that existing product can be used as the pin for determining the reference position.

Available sizes

■Adjusting Pin (Wit hex socket)

Adjustment Screw Material Hardness Surface Treatment
Fine Thread 1045 Carbon Steel 45-50HRC Electroless Nickel Plating
Trivalent Chromate
4137 Alloy Steel 50HRC-
304 Stainless Steel
420 Stainless Steel 45HRC-
Coarse Thread 1045 Carbon Steel 45-50HRC Electroless Nickel Plating
Trivalent Chromate
4137 Alloy Steel 50HRC-
304 Stainless Steel
420 Stainless Steel 45HRC-
Sizes and Dimensions
Screw Shaft Dia. (mm) Length(mm)
3 10-40(Increments of 5)
4 10-50(Increments of 5)、60
5 10-50(Increments of 5)、60
6 15-50(Increments of 5)、60

Back to page top

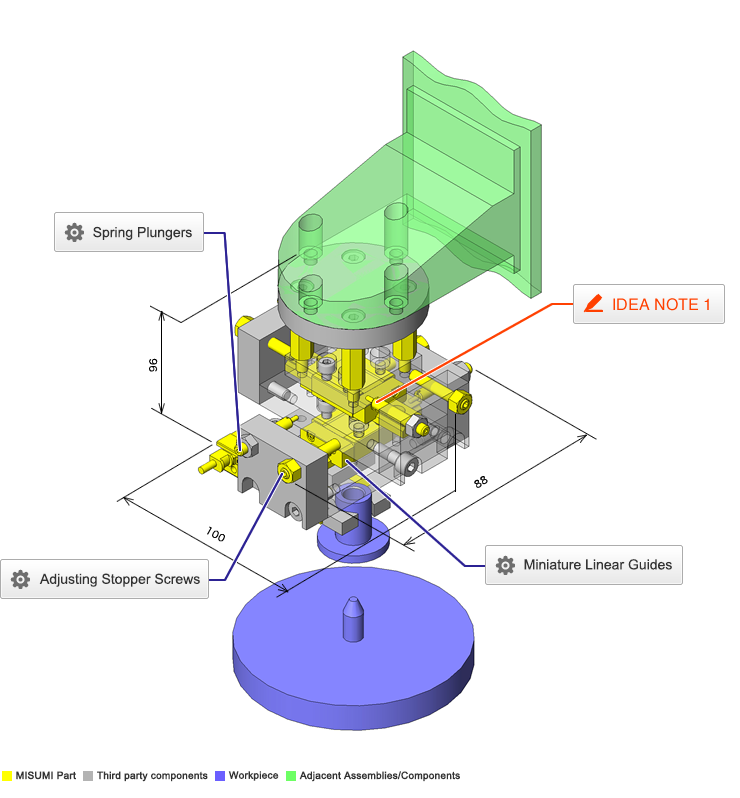
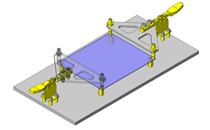
IDEA NOTE Position setting before insertion of workpiece

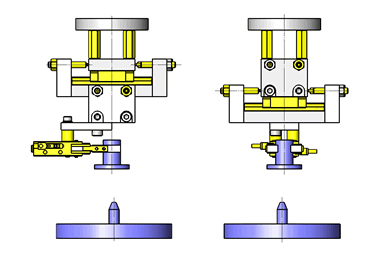
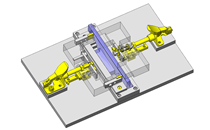
Due to the arrangement of the spring plungers and mounting screws at both ends of each liner guide, adjustment of chuck position to center before insertion of workpiece is facilitated.

  • TERMS AND CONDITIONS FOR USE OF CAD DATA
    Your access to the CAD data that MISUMI Corporation (hereinafter referred to as the Company) posts on this site (including 3D CAD data, intermediate 3D CAD data and 2D CAD data; hereinafter referred to as the Data) are of products manufactured and/or sold by the Company (hereinafter referred to as the Products) assumes that you have read and accepted these terms and conditions which govern your use of the Data. If you do not agree to these terms and conditions, you must stop using this website and the Data. You must not use the Data for any unlawful purpose or in any manner inconsistent with these terms and conditions.
    1. CAD Data
    The Data is prepared for assisting the Company's users in the CAD design process by providing dimensions and other Product information. In order to provide the best speed and stability working within this site, the Product drawings were simplified to reduce the size of the Data. For instance, some of the Products are shown without the oil groove shape, screws or spring shape. Also, please be aware that the tolerance, surface roughness and/or chamfer of the Data may vary from the actual Products.
    2. Disclaimer on Data
    While the Company has carefully prepared the Data, accuracy of the Data is not guaranteed and is subject to the variances as described above. The Company may also modify, add or delete the Data at any time without prior notice. The Company assumes no liability for any direct, indirect, consequential or special damages that you may claim resulted from your use of the Data or any changes to or deletions of the Data regardless of the reason. The Company provides no warranty as to the quality, accuracy, functionality, safety or reliability of the combination of Products and parts. Example applications and combinations of the Products are provided for illustrative purposes only.
    3. Copyright
    Copyrights to the content and the Data belong to the Company or the manufacturers of the Products. The said copyright is protected by the Copyright Act and international treaties. The use (including duplication, modification, uploading, posting, transmission, distribution, licensing, sales and publishing) of the Data except for the purpose to use the Data described above without prior approval of the Company is not allowed. The Data cannot be used for any purposes (including sales promotion) except for designing your machine. If you violate this provision or the laws or regulations, the Company may prohibit you from the use of the Data, the Company’s site and/or take legal action. So long as you comply with these terms and conditions, the Company grants to you a non-exclusive, non-transferable, revocable license to access and use the Data for the sole purpose of assisting you in designing machines that incorporate products.
    In case that the CAD data is found to have been to be used for any purpose other than mentioned above or against the related laws, MISUMI may take legal actions, including the one for blocking the involved user from using CAD data and from accessing to the MISUMI site.
    4. Disclaimer of Warranty
    ANY AND ALL CONTENT APPEARING ON THIS WEB SITE IS PROVIDED FOR INFORMATIONAL PURPOSES ONLY. THIS WEB SITE, ITS CONTENT AND ITS LINKS ARE PROVIDED ON AN "AS IS" AND "AS AVAILABLE" BASIS AND ARE USED ONLY AT YOUR SOLE RISK, TO THE FULLEST EXTENT PERMISSIBLE BY LAW. THE COMPANY DISCLAIMS ALL WARRANTIES, EXPRESS OR IMPLIED, OF ANY KIND, REGARDING THIS WEB SITE (INCLUDING ITS CONTENT, HARDWARE, SOFTWARE AND LINKS), INCLUDING AS TO FITNESS FOR A PARTICULAR PURPOSE, MERCHANTABILITY, TITLE, NON INFRINGEMENT, RESULTS, ACCURACY, COMPLETENESS, ACCESSIBILITY, COMPATIBILITY, SECURITY AND FREEDOM FROM COMPUTER VIRUS. THE COMPANY WILL NOT BE LIABLE FOR ANY DAMAGES OR LOSSES, INCLUDING DIRECT, INDIRECT, CONSEQUENTIAL, SPECIAL, INCIDENTAL OR PUNITIVE DAMAGES AND/OR LOST PROFITS, IN CONNECTION WITH USE OF THE INTERNET, THIS WEB SITE, ITS CONTENT OR ITS LINKS
    Further, the Company will not be liable to you for any failure or delay by the Company to provide access to the Data or any of its obligations under these terms and conditions where such failure or delay is the direct or indirect result of any circumstances beyond the Company's reasonable control (and the Company's obligations will be suspended for the duration of such circumstances).

    CAD Download (Unit Assembly)

    CAD Download: File Format
    生成

    Thank you for downloading the data.

    Click the Good IDEA! button when you find interesting design tips.


    This data is utilized in order to list more useful application examples in the future.

    CAD Data Limitations

    1. Assembly data shows the assembly drawings in the concept design phase. The sole purpose of the data is to explain the structure and functionality of the assembly and is not considered nor to be used as a final design.
      You will need to edit the Data so that it meets your specific design conditions.
    2. Unit assembly Data consists of some sub-assemblies.
      It is configured so that each sub-assembly unit can be used as it is or edited.
    3. * The part in the frame is a sub-assembly unit.

    4. The Data for fabricated parts is based on easy-to-edit dimensions and shapes in sketches and histories.
    5. The Data including the third-part components are made by the Company.

    Page top

  • * Unit assembly Data consists of some sub-assemblies.
       It is configured so that each sub-assembly unit can be used as it is or edited.
Application Overview

Purpose

  • Purpose
    • To fit bushings onto a roughly positioned pin.
  • Operation
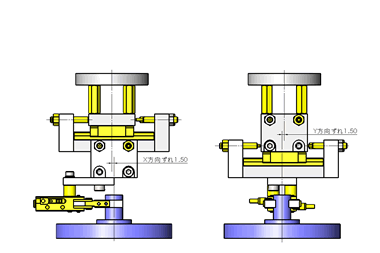
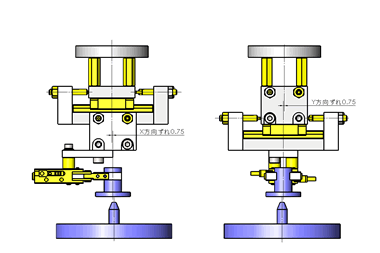
    • This mechanism is designed to perform floating in the X and Y directions via two linear guides installed between the lift unit and the bushing chuck. Before the bushing is fit on the pin, the bushing chuck is at the center position. The lift unit lowers the bushing and bushing chuck. The bushing is floated toward the pin and then fit on the pin. After fitting the bushing, the bushing chuck is returned to the center by the spring plunger.

Target workpiece

  • (1) Bushing
  • Shape: cylinder
  • Size: φ20 x H20mm
  • Weight: 7g
  • (2) Pin
  • Shape: column
  • Size: φ7 x H15mm
  • Weight: 110g

Design Specifications

Operating Conditions or Design Requirements

  • Vertical stroke by lift unit: 38mm
  • Allowable maximum displacement between inserted workpiece: L = 1.5mm
  • Outer dimensions: W88 x D100 x H96mm

Required Performance

  • Positioning accuracy: ±0.1mm

Selection Criteria for Main Components

  • Spring Plungers
    • To enable the bushing chuck to be returned to the center position when the inserted workpiece is unclamped, select spring plungers whose minimum load is larger than the seal resistance of the linear guide, which is between 2N and 5N.

Design Evaluation

Verification of main components

  • Compare the centering force against the spring plunger clamp force to see whether the workpiece can be centered
  • Check the centering force of the inserted workpiece and the spring plunger clamp power
    • Conditional value: centering pin taper angle of inserted workpiece θ = 23°, downward clamp force of lift unit P = 30N, gravitational acceleration g = 9.8m/s², friction coefficient: µ = 0.2 (metal and metal)
    • Friction angle: ψ, from μ = tanψ, ψ = tan - 1μ = tan - 1 (0.2) = 11.3°
    • The inserting workpiece centering force F is, from P = F x tan (θ + ψ), F = P/(tan (θ + ψ)) = 30/(tan (23 + 11.3)) = 44.0N
    • Spring plunger clamp power PS = 5.8 to 13.6N = inserting workpiece centering force F = 44.0N
      ⇒ As the inserting workpiece centering force is sufficiently larger than the spring plunger clamp power, centering cannot be achieved. The chuck position should be returned to the center before workpiece insertion.

Explore Similar Application Examples

Page - / -

Part List

No. Part Name Sample Picture MISUMI Part Number
(click the Part Number below for details)
Quantity
1 Linear Guides SSEB10-55 2
2 Air Gripper Parallel Type ACHK4-D 1
3 Sensors for Air Cylinders ME33L1 2
4 Finger For Chuck ACHATW4-L12-P16.6 2
5 Spring Plungers PJXW4-4 4
6 Screw Stopper ANBNS4-25 4
7 Metal Washers WSSM8-3-8 2
8 Hex Posts PLSBWRK7-20 4
  • The part list above only contains MISUMI parts.
    Part list download (CSV) includes MISUMI and third party components used in this example.
  • TERMS AND CONDITIONS FOR USE OF CAD DATA
    Your access to the CAD data that MISUMI Corporation (hereinafter referred to as the Company) posts on this site (including 3D CAD data, intermediate 3D CAD data and 2D CAD data; hereinafter referred to as the Data) are of products manufactured and/or sold by the Company (hereinafter referred to as the Products) assumes that you have read and accepted these terms and conditions which govern your use of the Data. If you do not agree to these terms and conditions, you must stop using this website and the Data. You must not use the Data for any unlawful purpose or in any manner inconsistent with these terms and conditions.
    1. CAD Data
    The Data is prepared for assisting the Company's users in the CAD design process by providing dimensions and other Product information. In order to provide the best speed and stability working within this site, the Product drawings were simplified to reduce the size of the Data. For instance, some of the Products are shown without the oil groove shape, screws or spring shape. Also, please be aware that the tolerance, surface roughness and/or chamfer of the Data may vary from the actual Products.
    2. Disclaimer on Data
    While the Company has carefully prepared the Data, accuracy of the Data is not guaranteed and is subject to the variances as described above. The Company may also modify, add or delete the Data at any time without prior notice. The Company assumes no liability for any direct, indirect, consequential or special damages that you may claim resulted from your use of the Data or any changes to or deletions of the Data regardless of the reason. The Company provides no warranty as to the quality, accuracy, functionality, safety or reliability of the combination of Products and parts. Example applications and combinations of the Products are provided for illustrative purposes only.
    3. Copyright
    Copyrights to the content and the Data belong to the Company or the manufacturers of the Products. The said copyright is protected by the Copyright Act and international treaties. The use (including duplication, modification, uploading, posting, transmission, distribution, licensing, sales and publishing) of the Data except for the purpose to use the Data described above without prior approval of the Company is not allowed. The Data cannot be used for any purposes (including sales promotion) except for designing your machine. If you violate this provision or the laws or regulations, the Company may prohibit you from the use of the Data, the Company’s site and/or take legal action. So long as you comply with these terms and conditions, the Company grants to you a non-exclusive, non-transferable, revocable license to access and use the Data for the sole purpose of assisting you in designing machines that incorporate products.
    In case that the CAD data is found to have been to be used for any purpose other than mentioned above or against the related laws, MISUMI may take legal actions, including the one for blocking the involved user from using CAD data and from accessing to the MISUMI site.
    4. Disclaimer of Warranty
    ANY AND ALL CONTENT APPEARING ON THIS WEB SITE IS PROVIDED FOR INFORMATIONAL PURPOSES ONLY. THIS WEB SITE, ITS CONTENT AND ITS LINKS ARE PROVIDED ON AN "AS IS" AND "AS AVAILABLE" BASIS AND ARE USED ONLY AT YOUR SOLE RISK, TO THE FULLEST EXTENT PERMISSIBLE BY LAW. THE COMPANY DISCLAIMS ALL WARRANTIES, EXPRESS OR IMPLIED, OF ANY KIND, REGARDING THIS WEB SITE (INCLUDING ITS CONTENT, HARDWARE, SOFTWARE AND LINKS), INCLUDING AS TO FITNESS FOR A PARTICULAR PURPOSE, MERCHANTABILITY, TITLE, NON INFRINGEMENT, RESULTS, ACCURACY, COMPLETENESS, ACCESSIBILITY, COMPATIBILITY, SECURITY AND FREEDOM FROM COMPUTER VIRUS. THE COMPANY WILL NOT BE LIABLE FOR ANY DAMAGES OR LOSSES, INCLUDING DIRECT, INDIRECT, CONSEQUENTIAL, SPECIAL, INCIDENTAL OR PUNITIVE DAMAGES AND/OR LOST PROFITS, IN CONNECTION WITH USE OF THE INTERNET, THIS WEB SITE, ITS CONTENT OR ITS LINKS
    Further, the Company will not be liable to you for any failure or delay by the Company to provide access to the Data or any of its obligations under these terms and conditions where such failure or delay is the direct or indirect result of any circumstances beyond the Company's reasonable control (and the Company's obligations will be suspended for the duration of such circumstances).

    CAD Download (Unit Assembly)

    CAD Download: File Format
    生成

    Thank you for downloading the data.

    Click the Good IDEA! button when you find interesting design tips.


    This data is utilized in order to list more useful application examples in the future.

    CAD Data Limitations

    1. Assembly data shows the assembly drawings in the concept design phase. The sole purpose of the data is to explain the structure and functionality of the assembly and is not considered nor to be used as a final design.
      You will need to edit the Data so that it meets your specific design conditions.
    2. Unit assembly Data consists of some sub-assemblies.
      It is configured so that each sub-assembly unit can be used as it is or edited.
    3. * The part in the frame is a sub-assembly unit.

    4. The Data for fabricated parts is based on easy-to-edit dimensions and shapes in sketches and histories.
    5. The Data including the third-part components are made by the Company.

    Page top

Page top