(!)Due to Microsoft's end of support for Internet Explorer 11 on 15/06/2022, this site does not support the recommended environment.

ideanote
inCAD Library

Please read before use

What is inCAD Library?

  • Helpful application examples for mechanical engineers.

The Concept of inCAD Library

  • Online application library with a range of ideas for all manufacturing industries.
  • Save design time and learn new design applications when you are concepting new machines.

Disclaimer

  • MISUMI may not offer all parts in each application design. Available parts can only be purchased separately not as a unit shown in each application design.
  • MISUMI does not guarantee quality, accuracy, functionality, safety or reliability for the combination of the parts in each application example. Accept these points prior to use.
  • 2014 Copyright MISUMI
  • The data cannot be used for any purposes (including sales promotion) except for designing your machine.
  • All associated CAD is free. Misumi reserves the right at its sole discretion to cancel, terminate or modify this offer.
  • MISUMI may change, add or delete application examples posted without prior notice.
  • MISUMI assumes no responsibilities for any damage incurred resulting from your use of the Service or any change, addition or deletion by MISUMI of the application examples for any reason whatsoever.

inCAD Library Features

  1. Get great new design ideas for these application examples.
  2. Over 300 design application ideas
    collected from dozens of industries!

  3. Find application examples quickly! Search by function, workpiece shape, etc.

  4. Download the CAD models for each application example.
  5. Log in to download free CAD models.
    Download CAD for the entire application example!

Good IDEA! button

Click the Good IDEA! Button when you like an application example!

*Can only be clicked once per application example.

  • Upper right corner on the page of application example details

  • Pop-up dialog for CAD data downloading

Page top

Keyword Search
No. Search

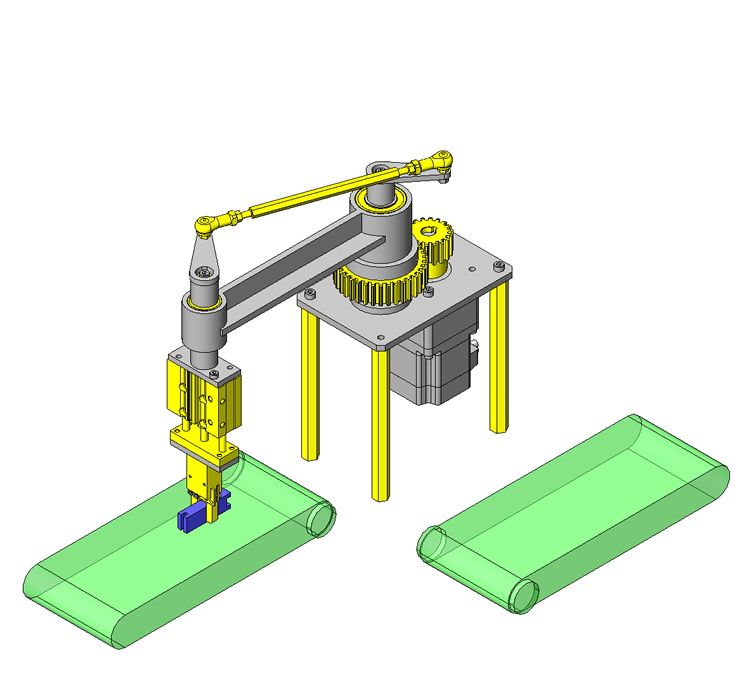
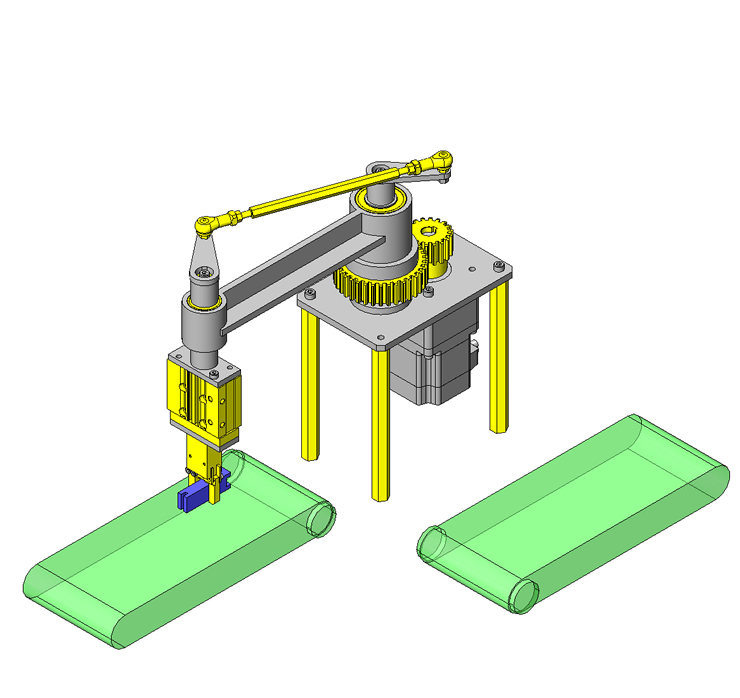
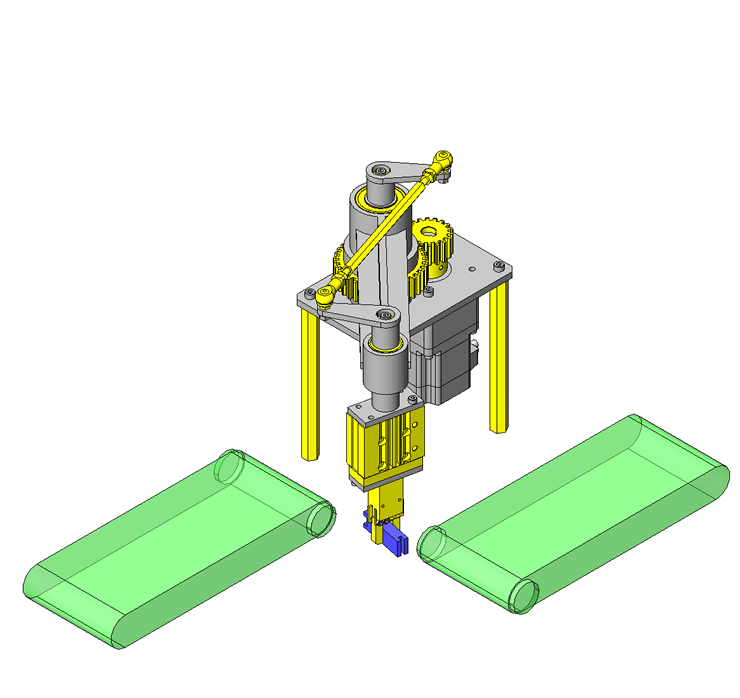
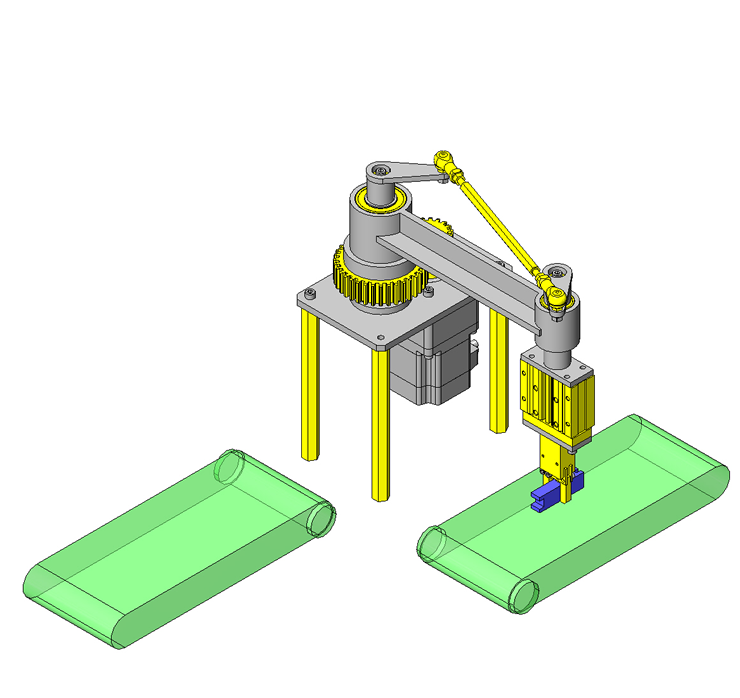
No.000075 Rotate and Transfer Mechanism

Motor and gear system rotates the arm and gripper simultaneously.

Relevant category

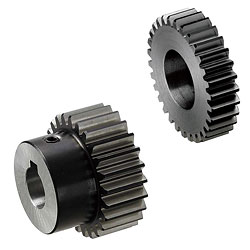
Spur Gears

Product name Induction Hardened Spur Gears - Pressure Angle 20Deg.
Part number GEAHBH2.0-36-20-A-35
Features Gears with hardened teeth which provides excellent strength, abrasion resistance and high precision
* Orange colored cells in the table below indicate the part numbers used in this example.

Selection criteria

A gear is placed to reduce the speed of the motor output rotation by half

Back to page top

Available sizes

■Induction Hardened Spur Gears (Ground)

Material Surface Treatment Hardness Accessory
1045 Carbon Steel Black Oxide Tooth Induction Hardened
51 - 55 HRC (depth 1 mm or more)
Set screw
(4137 Alloy Steel Black Oxide)

■Sizes and Dimensions

Module Number of Teeth Shaft bore DIA.
(1 mm Increments)
Round Hole
Round Hole + Tap
Keyway
Keyway + Tap
2.0 15 12-17 12-14
16 12-18 12-15
18 12-21 12-18
20 15-22 15-19
22
24 15-26 15-23
25 15-28 15-24
28 15-31 15-28
30 18-35 18-31
32
36
40 20-42 20-38
45
48
50 25-42 25-38
60 25-45 25-42
2.5 16 15-22 15-19
20 18-28 18-24
24 18-33 18-30
25 20-35 20-31
28 20-42 20-38
30 20-45 20-42
36 20-49 20-45
40 25-49 25-45
45 25-52 25-49
48
50 25-56 25-50

Back to page top

Accuracy Info

■Accuracy of Induction Hardened Spur Gears (Ground)

Gear accuracy: Previous JIS B 1702 Class 2 (New JIS B 1702-1 Class 6 equivalent)
Shaft bore DIA. tolerance: H7

Back to page top

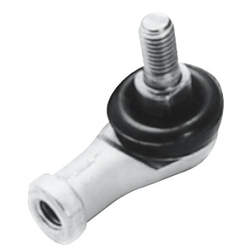
Rod End Bearings

Product name Rod End Bearings - 90 Deg. Link Ball Type
Part number RBLD5
* Orange colored cells in the table below indicate the part numbers used in this example.

Selection criteria

Connecting link mechanism.

Back to page top

Available sizes

■Rod End Bearings (Link Ball L Type / Right hand thread)

Material
Holder High Strength Zinc Alloy
* M4, 5: High Strength Aluminum Alloy
Shank with Ball 1035 Carbon Steel
Boots NBR Type Special Synthetic Rubber

■Sizes and Dimensions

Thread Dia. Ball Center - Holder Edge Ball Center - Shank Edge
4 18 15
5 27 21
6 30 26
8 36 31
10 43 43
10(Fine Thread) 37
12 50 49
12(Fine Thread) 42
14 57 62
14(Fine Thread) 56
16 64 66
16(Fine Thread) 60

Back to page top

Accuracy Info.

■Allowable Incline Angle of Rod End Bearings

Thread Dia. Allowable Incline Angle
4 40°
5
6
8
10
10(Fine Thread)
12
12(Fine Thread)
14
14(Fine Thread)
16 30°
16(Fine Thread)

Back to page top

Performance info.

■Yield Strength and Static Load Capacity of Rod End Bearings

Thread Dia. Yield Strength
(N)
Static Load Capacity (N)
4 1370 4510
5 2250 6470
6 3920 9900
8 6570 12500
10 11300 18300
10(Fine Thread)
12 16400 26700
12(Fine Thread)
14 19800 36400
14(Fine Thread)
16 26900
16(Fine Thread)

Back to page top

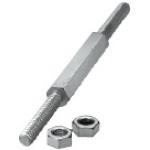
Rod End Coupling Rods

Product name Rod End Coupling Rods - Both Ends Threaded
Part number LBRFN5-180
Features Rod End Coupling Rods with the right-hand/left-hand thread selectable in size and length.
* Orange colored cells in the table below indicate the part numbers used in this example.

Selection criteria

To connect rod end bearings.

Back to page top

Available sizes

■Rod End Coupling Rods (Both Ends Threaded, Length Configurable)

Material Surface Treatment Accessory (one hex nut for right / left-hand thread)
Material Surface Treatment
1045 Carbon Steel Black Oxide 1045 Carbon Steel Trivalent Chromate
Electroless Nickel Plating
304 Stainless Steel - 304 Stainless Steel -

■Sizes and Dimensions

Thread Dia.
(Coarse)
Overall Length Thread Length
(Under Head)
Opposite Side
3 25-39 8 6
40-300 15
4 35-49 12 7
50-400 20
5 40-59 13 8
60-600 25
6 50-69 17 10
70-600 30
8 60-89 23 13
90-1000 40
10 70-109 28 17
110-1000 50
12 80-129 33 19
130-1000 60
14 130-1000 60 21
16 170-1000 80 24
18 170-1000 80 27
20 170-1000 80 30
22 170-1000 80 32

Back to page top

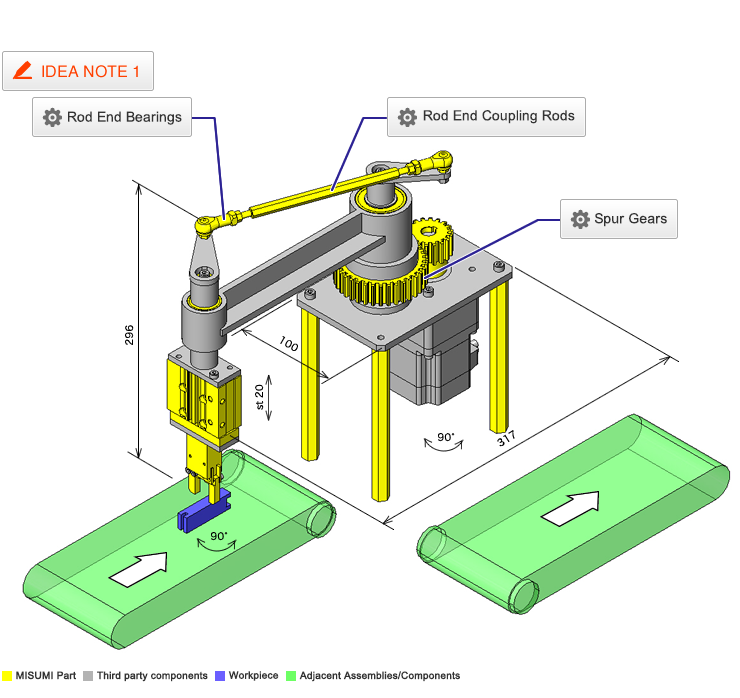
IDEA NOTE Have on actuator perform both the swing and rotation of the work piece.

Linkage ratio is set to 1:1. When the transfer angle reaches 90°, the gripper rotates 90°. As a result the workpiece is now oriented 180° from it's initial orientation.

  • TERMS AND CONDITIONS FOR USE OF CAD DATA
    Your access to the CAD data that MISUMI Corporation (hereinafter referred to as the Company) posts on this site (including 3D CAD data, intermediate 3D CAD data and 2D CAD data; hereinafter referred to as the Data) are of products manufactured and/or sold by the Company (hereinafter referred to as the Products) assumes that you have read and accepted these terms and conditions which govern your use of the Data. If you do not agree to these terms and conditions, you must stop using this website and the Data. You must not use the Data for any unlawful purpose or in any manner inconsistent with these terms and conditions.
    1. CAD Data
    The Data is prepared for assisting the Company's users in the CAD design process by providing dimensions and other Product information. In order to provide the best speed and stability working within this site, the Product drawings were simplified to reduce the size of the Data. For instance, some of the Products are shown without the oil groove shape, screws or spring shape. Also, please be aware that the tolerance, surface roughness and/or chamfer of the Data may vary from the actual Products.
    2. Disclaimer on Data
    While the Company has carefully prepared the Data, accuracy of the Data is not guaranteed and is subject to the variances as described above. The Company may also modify, add or delete the Data at any time without prior notice. The Company assumes no liability for any direct, indirect, consequential or special damages that you may claim resulted from your use of the Data or any changes to or deletions of the Data regardless of the reason. The Company provides no warranty as to the quality, accuracy, functionality, safety or reliability of the combination of Products and parts. Example applications and combinations of the Products are provided for illustrative purposes only.
    3. Copyright
    Copyrights to the content and the Data belong to the Company or the manufacturers of the Products. The said copyright is protected by the Copyright Act and international treaties. The use (including duplication, modification, uploading, posting, transmission, distribution, licensing, sales and publishing) of the Data except for the purpose to use the Data described above without prior approval of the Company is not allowed. The Data cannot be used for any purposes (including sales promotion) except for designing your machine. If you violate this provision or the laws or regulations, the Company may prohibit you from the use of the Data, the Company’s site and/or take legal action. So long as you comply with these terms and conditions, the Company grants to you a non-exclusive, non-transferable, revocable license to access and use the Data for the sole purpose of assisting you in designing machines that incorporate products.
    In case that the CAD data is found to have been to be used for any purpose other than mentioned above or against the related laws, MISUMI may take legal actions, including the one for blocking the involved user from using CAD data and from accessing to the MISUMI site.
    4. Disclaimer of Warranty
    ANY AND ALL CONTENT APPEARING ON THIS WEB SITE IS PROVIDED FOR INFORMATIONAL PURPOSES ONLY. THIS WEB SITE, ITS CONTENT AND ITS LINKS ARE PROVIDED ON AN "AS IS" AND "AS AVAILABLE" BASIS AND ARE USED ONLY AT YOUR SOLE RISK, TO THE FULLEST EXTENT PERMISSIBLE BY LAW. THE COMPANY DISCLAIMS ALL WARRANTIES, EXPRESS OR IMPLIED, OF ANY KIND, REGARDING THIS WEB SITE (INCLUDING ITS CONTENT, HARDWARE, SOFTWARE AND LINKS), INCLUDING AS TO FITNESS FOR A PARTICULAR PURPOSE, MERCHANTABILITY, TITLE, NON INFRINGEMENT, RESULTS, ACCURACY, COMPLETENESS, ACCESSIBILITY, COMPATIBILITY, SECURITY AND FREEDOM FROM COMPUTER VIRUS. THE COMPANY WILL NOT BE LIABLE FOR ANY DAMAGES OR LOSSES, INCLUDING DIRECT, INDIRECT, CONSEQUENTIAL, SPECIAL, INCIDENTAL OR PUNITIVE DAMAGES AND/OR LOST PROFITS, IN CONNECTION WITH USE OF THE INTERNET, THIS WEB SITE, ITS CONTENT OR ITS LINKS
    Further, the Company will not be liable to you for any failure or delay by the Company to provide access to the Data or any of its obligations under these terms and conditions where such failure or delay is the direct or indirect result of any circumstances beyond the Company's reasonable control (and the Company's obligations will be suspended for the duration of such circumstances).

    CAD Download (Unit Assembly)

    CAD Download: File Format
    生成

    Thank you for downloading the data.

    Click the Good IDEA! button when you find interesting design tips.


    This data is utilized in order to list more useful application examples in the future.

    CAD Data Limitations

    1. Assembly data shows the assembly drawings in the concept design phase. The sole purpose of the data is to explain the structure and functionality of the assembly and is not considered nor to be used as a final design.
      You will need to edit the Data so that it meets your specific design conditions.
    2. Unit assembly Data consists of some sub-assemblies.
      It is configured so that each sub-assembly unit can be used as it is or edited.
    3. * The part in the frame is a sub-assembly unit.

    4. The Data for fabricated parts is based on easy-to-edit dimensions and shapes in sketches and histories.
    5. The Data including the third-part components are made by the Company.

    Page top

  • * Unit assembly Data consists of some sub-assemblies.
       It is configured so that each sub-assembly unit can be used as it is or edited.

Application Overview

Purpose

  • Transfers work pieces on a conveyor to the next process by rotating the work piece 180°. The arm rotates the work piece the first 90° and the linkage rotates the gripper the second 90°.
  • Gripper down→Retain workpiece→Gripper up→ 90° rotate & transfer・Workpiece rotate 90°→Gripper down →Workpiece released →Gripper up.

Target workpiece

  • Shape: Connector
    Size: W50×D10×H15mm
    Weight: 0.1 kg

Design Specifications

Operating Conditions or Design Requirements

  • Transfer angle: 90 degrees
  • Workpiece rotation angle: 90 degrees
  • Cylinder stroke: 20mm
  • Clamp stroke: 10mm
  • External dims: W100 x D317 x H269 (Before rotation)

Selection Criteria for Main Components

  • Ratio of fixed linkage and moving linkage ratio to be 1:1.
  • Suppress inertia by reducing weight of swinging components.
  • Confirm that the gear is strong enough to withstand the inertial force.
  • Select the air gripper based on friction coefficient and workpiece weight.

Design Evaluation

Verification of main components

  • It is important to calculate the inertia that applies to the stepper motor. The calculations are below.
    • Time that takes to move 90° t 1 : 0.5sec
    • Acceleration time t 0 : 0.01sec
    • Swinging and rotating arm inertia moment: J 1 =4.063×10 ⁻² ㎏・㎡
    • Inertia moment of a gear on the motor shaft: J 2 =3.598×10 ⁵ ㎏・㎡
    • Inertia moment applicable to motor shaft: Since it is via gear, JL = J 1 ×(Number of Teeth of sm. gear / Number of Teeth of L. gear) ² +J 2 =1.019×10 ⁻² ㎏・㎡
    • Operating pulses:A=θ/θs=1250pulses
      Here, the operating angle:θ=90°, Min. step angle of stepping motor:θs=0.072°
    • Operational pulse rate: f2 2 =A/(t 0 -t 1 )=3125Hz
    • Motion speed: NM=θs/360×f 2 ×60=37.5r/min
    • Inertia moment of motor's rotor: J = 0 =2.8×10
    • Motor gear ratio: i = 10
    • Acceleration torque calculation: Ta = (J 0 ・i ² +JL)/9.55×NM/t 1 =0.51N・m
    • Calculation of required torque:TM=Ta×Safety margin=1.02N・m Safety ratio given: 2) Select motor from torque characteristics chart.Motor is OK
    • Verifying inertia ratio: JL/ (J 0 ×i ² )=3.64≦10 is OK

Other Design Consideration

  • The main shaft (center of rotation) and linkage arm to the main shaft are fixed.
  • The gripper at rotation end can elevate and rotate.

Explore Similar Application Examples

Page - / -

Part List

No. Part Name Sample Picture MISUMI Part Number
(click the Part Number below for details)
Quantity
1 Deep Groove Ball Bearings B6004ZZ 2
2 Deep Groove Ball Bearings B6001ZZ 2
3 Super Gear GEAHBH2.0-36-20-A-35 1
4 Super Gear GEAKBH2.0-18-20-B-12N-KC120 1
5 Rotary Shaft PSFGKRW12-78-M5-N5-KA0-A18-KB60-B18 1
6 Collars FNCLM-V20-D26-L38 1
7 Collars NCLM12-16-22 1
8 Metal Washers WSSB15-4-2 3
9 Air Cylinders With Twin Guides MGCLBN12-20 1
10 Air Gripper Parallel Type ACHK6-D 1
11 Fingers for Air Grippers YFTB6-P10-L20 2
12 Rod End Bearings RBLD5 1
13 Rod End Bearings RBLDL5 1
14 Rod End Coupling Rods LBRFN5-180 1
15 Hex Posts PLSBF13-150-M5-N5 4
16 Parallel Keys KEG4-18 3
  • The part list above only contains MISUMI parts.
    Part list download (CSV) includes MISUMI and third party components used in this example.
  • TERMS AND CONDITIONS FOR USE OF CAD DATA
    Your access to the CAD data that MISUMI Corporation (hereinafter referred to as the Company) posts on this site (including 3D CAD data, intermediate 3D CAD data and 2D CAD data; hereinafter referred to as the Data) are of products manufactured and/or sold by the Company (hereinafter referred to as the Products) assumes that you have read and accepted these terms and conditions which govern your use of the Data. If you do not agree to these terms and conditions, you must stop using this website and the Data. You must not use the Data for any unlawful purpose or in any manner inconsistent with these terms and conditions.
    1. CAD Data
    The Data is prepared for assisting the Company's users in the CAD design process by providing dimensions and other Product information. In order to provide the best speed and stability working within this site, the Product drawings were simplified to reduce the size of the Data. For instance, some of the Products are shown without the oil groove shape, screws or spring shape. Also, please be aware that the tolerance, surface roughness and/or chamfer of the Data may vary from the actual Products.
    2. Disclaimer on Data
    While the Company has carefully prepared the Data, accuracy of the Data is not guaranteed and is subject to the variances as described above. The Company may also modify, add or delete the Data at any time without prior notice. The Company assumes no liability for any direct, indirect, consequential or special damages that you may claim resulted from your use of the Data or any changes to or deletions of the Data regardless of the reason. The Company provides no warranty as to the quality, accuracy, functionality, safety or reliability of the combination of Products and parts. Example applications and combinations of the Products are provided for illustrative purposes only.
    3. Copyright
    Copyrights to the content and the Data belong to the Company or the manufacturers of the Products. The said copyright is protected by the Copyright Act and international treaties. The use (including duplication, modification, uploading, posting, transmission, distribution, licensing, sales and publishing) of the Data except for the purpose to use the Data described above without prior approval of the Company is not allowed. The Data cannot be used for any purposes (including sales promotion) except for designing your machine. If you violate this provision or the laws or regulations, the Company may prohibit you from the use of the Data, the Company’s site and/or take legal action. So long as you comply with these terms and conditions, the Company grants to you a non-exclusive, non-transferable, revocable license to access and use the Data for the sole purpose of assisting you in designing machines that incorporate products.
    In case that the CAD data is found to have been to be used for any purpose other than mentioned above or against the related laws, MISUMI may take legal actions, including the one for blocking the involved user from using CAD data and from accessing to the MISUMI site.
    4. Disclaimer of Warranty
    ANY AND ALL CONTENT APPEARING ON THIS WEB SITE IS PROVIDED FOR INFORMATIONAL PURPOSES ONLY. THIS WEB SITE, ITS CONTENT AND ITS LINKS ARE PROVIDED ON AN "AS IS" AND "AS AVAILABLE" BASIS AND ARE USED ONLY AT YOUR SOLE RISK, TO THE FULLEST EXTENT PERMISSIBLE BY LAW. THE COMPANY DISCLAIMS ALL WARRANTIES, EXPRESS OR IMPLIED, OF ANY KIND, REGARDING THIS WEB SITE (INCLUDING ITS CONTENT, HARDWARE, SOFTWARE AND LINKS), INCLUDING AS TO FITNESS FOR A PARTICULAR PURPOSE, MERCHANTABILITY, TITLE, NON INFRINGEMENT, RESULTS, ACCURACY, COMPLETENESS, ACCESSIBILITY, COMPATIBILITY, SECURITY AND FREEDOM FROM COMPUTER VIRUS. THE COMPANY WILL NOT BE LIABLE FOR ANY DAMAGES OR LOSSES, INCLUDING DIRECT, INDIRECT, CONSEQUENTIAL, SPECIAL, INCIDENTAL OR PUNITIVE DAMAGES AND/OR LOST PROFITS, IN CONNECTION WITH USE OF THE INTERNET, THIS WEB SITE, ITS CONTENT OR ITS LINKS
    Further, the Company will not be liable to you for any failure or delay by the Company to provide access to the Data or any of its obligations under these terms and conditions where such failure or delay is the direct or indirect result of any circumstances beyond the Company's reasonable control (and the Company's obligations will be suspended for the duration of such circumstances).

    CAD Download (Unit Assembly)

    CAD Download: File Format
    生成

    Thank you for downloading the data.

    Click the Good IDEA! button when you find interesting design tips.


    This data is utilized in order to list more useful application examples in the future.

    CAD Data Limitations

    1. Assembly data shows the assembly drawings in the concept design phase. The sole purpose of the data is to explain the structure and functionality of the assembly and is not considered nor to be used as a final design.
      You will need to edit the Data so that it meets your specific design conditions.
    2. Unit assembly Data consists of some sub-assemblies.
      It is configured so that each sub-assembly unit can be used as it is or edited.
    3. * The part in the frame is a sub-assembly unit.

    4. The Data for fabricated parts is based on easy-to-edit dimensions and shapes in sketches and histories.
    5. The Data including the third-part components are made by the Company.

    Page top

Page top